 (1)")

Remember when Taco Bell quietly removed the quesarito from most locations, leaving countless fans heartbroken? That crispy, cheesy, burrito-wrapped masterpiece became the stuff of fast-food legends. The good news is you don’t need to hunt down one of the few remaining locations or rely on app-only ordering – making your own quesarito at home is surprisingly simple and tastes way better than anything you’ll get from a drive-thru window.
Building the perfect quesadilla base takes patience
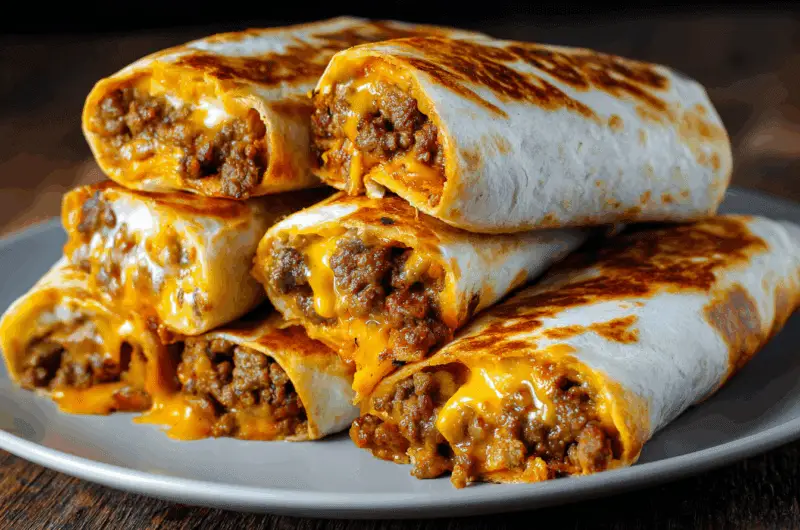
The secret to an authentic quesarito lies in the quesadilla shell, and most people rush this crucial step. Start with the largest flour tortillas you can find – those burrito-sized ones work perfectly. Heat a large skillet over medium heat and lay one tortilla flat. The key is using both shredded cheese and nacho cheese for maximum melt factor and that signature gooey texture.
Spread your shredded cheese evenly across the tortilla, then add dollops of nacho cheese on top. Don’t worry about perfect distribution – the second tortilla will help spread things around. Place another tortilla on top and let it cook until the cheese starts melting, then carefully flip to finish the other side. The result should be golden brown and completely sealed with melted cheese throughout.
Ground beef seasoning makes all the difference
Plain ground beef won’t cut it for an authentic quesarito experience. The magic happens with proper taco seasoning that mimics that distinctive fast-food taste. Brown two pounds of ground beef in a large skillet, breaking it up as it cooks. Once fully cooked, drain any excess fat and add your taco seasoning mix along with a splash of water.
Let the seasoned beef simmer for a few minutes until the liquid reduces and the spices fully coat every piece of meat. This creates that slightly saucy, well-seasoned filling that won’t dry out inside your quesarito. The beef should taste bold and savory on its own – if it seems bland, add more seasoning. Remember, this filling needs to hold up against all the other strong ingredients you’ll be adding.
Mexican rice adds essential texture and bulk
Plain white rice feels like a missed opportunity in a quesarito. Mexican rice brings color, spice, and that authentic restaurant quality that separates homemade from amateur attempts. Cook your rice with tomato sauce, onions, and garlic for that signature orange color and robust taste. The rice cooker method works perfectly here – just add your seasonings to the water and let it do the work.
The rice serves double duty in your quesarito by adding bulk and helping absorb some of the moisture from other ingredients. This prevents the dreaded soggy tortilla situation that ruins many homemade attempts. Make sure your rice isn’t too wet when you add it to the quesadilla – it should be fluffy and separate, not clumpy or mushy.
Cheese variety creates the ultimate melt factor
Using just one type of cheese is a rookie mistake that leads to disappointing results. The best quesaritos combine multiple cheeses for complex flavors and perfect melting properties. Monterey Jack provides excellent melt, while cheddar adds sharp taste. Oaxaca or asadero cheese brings that authentic Mexican touch with superior stretching abilities.
Shred your cheese fresh from the block rather than buying pre-shredded varieties. Those anti-caking agents in bagged cheese prevent smooth melting and can leave your quesadilla with a grainy texture. Mix your shredded cheeses together before adding them to the tortilla, and don’t skimp – you want a generous layer that will create that Instagram-worthy cheese pull when you bite into your finished quesarito.
Chipotle crema beats plain sour cream every time
Regular sour cream tastes flat and boring compared to smoky chipotle crema that adds heat and depth to every bite. Making chipotle crema is ridiculously simple – just blend sour cream with canned chipotle peppers in adobo sauce. Start with one pepper and adjust from there based on your heat tolerance. The adobo sauce provides most of the smoky flavor, so don’t skip it.
This sauce transforms your quesarito from good to restaurant-quality with minimal effort. The smokiness complements the beef perfectly while the creamy texture helps balance all the rich, heavy ingredients. Make extra chipotle crema because you’ll want to drizzle it on top of your finished quesarito too. Store leftovers in the fridge for up to a week and use on tacos, nachos, or anything that needs a flavor boost.
Assembly order prevents ingredient spillage disasters
Random ingredient placement leads to lopsided, impossible-to-fold quesaritos that fall apart at first bite. Place your cooked quesadilla on a large plate and imagine a line down the middle. Add all your fillings to one half only, staying about two inches from the edges. This gives you room to fold without everything squeezing out the sides.
Layer ingredients strategically – start with refried beans as they help everything stick together, then add rice, seasoned beef, and finish with sauces. The key technique is restraint. It should look slightly underfilled when you’re ready to fold because everything compresses during the rolling process. Too many fillings guarantee a messy eating experience and frustrated attempts at proper folding.
Proper folding technique keeps everything contained
The fold-and-roll method separates successful quesarito makers from those left cleaning filling off their plates. Start by folding the left and right sides of the quesadilla toward the center, creating envelope-like flaps. These side folds should overlap your filling by about an inch to prevent side leakage during eating.
Next, fold the bottom edge up and over your fillings, tucking it slightly under the ingredients. Roll tightly but gently toward the top, keeping pressure consistent to maintain the cylindrical shape. The final seam should be on the bottom of your quesarito, which helps it stay closed. If your tortilla tears during folding, your quesadilla wasn’t cooked long enough or you overfilled it.
Fresh toppings add brightness to rich ingredients
All those melted cheeses and seasoned beef create an incredibly rich eating experience that needs fresh elements for balance. Crisp lettuce, diced tomatoes, and fresh cilantro provide textural contrast and bright flavors that cut through the heaviness. Don’t dress your lettuce or season your tomatoes – you want their natural freshness to shine through.
Pickled red onions make an excellent addition that most people overlook. The vinegary bite and slight sweetness complement the smoky, spicy elements beautifully. A squeeze of fresh lime juice right before eating brightens everything up and adds that authentic Mexican restaurant finishing touch. These fresh elements transform your quesarito from heavy fast food to a more balanced, satisfying meal.
Temperature control ensures perfect cheese consistency
Nothing ruins a quesarito faster than overcooked, rubbery cheese or undercooked, barely melted filling. Medium heat works best for the quesadilla base – hot enough to melt the cheese thoroughly but not so hot that the tortilla burns before the inside heats through. Watch for the cheese to start bubbling slightly around the edges before attempting to flip.
When reheating leftover quesaritos, use low heat and cover the pan to create steam that remelts the cheese without overcooking the tortilla. The microwave method works in a pinch, but always wrap in a damp paper towel to prevent the tortilla from drying out. Properly heated quesaritos should have stretchy, gooey cheese and warm fillings throughout.
Making quesaritos at home gives you control over every ingredient and lets you customize them exactly how you like. Plus, you’ll save money and never have to wonder if your local Taco Bell actually has them available. Once you master this technique, you’ll wonder why you ever bothered with the drive-thru version that never quite lived up to the hype anyway.
Ultimate DIY Quesarito
Course: Dinner5
servings15
minutes40
minutes650
kcalThis homemade quesarito beats any drive-thru version with perfectly melted cheese, seasoned beef, and authentic Mexican flavors wrapped in a crispy quesadilla shell.
Ingredients
10 large flour tortillas
3 cups shredded cheese (Monterey Jack, cheddar, asadero mix)
15 ounce can nacho cheese
2 pounds ground beef
2 packets taco seasoning
2 cups cooked Mexican rice
16 ounce can refried beans
1 cup sour cream
2-3 chipotle peppers in adobo sauce
Directions
- Brown the ground beef in a large skillet over medium-high heat, breaking it up as it cooks until fully cooked through. Drain excess fat and add taco seasoning with a splash of water. Simmer for 3-4 minutes until the liquid reduces and spices coat the meat evenly.
- Make chipotle crema by blending sour cream with chipotle peppers and a spoonful of adobo sauce until smooth. Start with 1-2 peppers and adjust heat to taste. Set aside in refrigerator until ready to use.
- Heat a large skillet over medium heat and place one tortilla flat in the pan. Spread an even layer of shredded cheese across the tortilla, then add dollops of nacho cheese on top. Place a second tortilla on top and press gently.
- Cook the quesadilla for 3-4 minutes until golden brown and cheese begins melting, then carefully flip and cook another 2-3 minutes until second side is golden. The cheese should be completely melted and the tortillas crispy. Repeat to make all quesadillas.
- Place one quesadilla on a large plate and add fillings to one half only, staying 2 inches from edges. Start with a layer of refried beans, then add Mexican rice, seasoned ground beef, and finish with chipotle crema.
- Fold the left and right sides of the quesadilla toward the center, creating envelope flaps that overlap the filling by about 1 inch. This prevents side leakage during eating.
- Fold the bottom edge up and over the fillings, tucking slightly under the ingredients. Roll tightly but gently toward the top, maintaining consistent pressure to keep the cylindrical shape.
- Place seam-side down on serving plate and repeat with remaining quesadillas and fillings. Serve immediately while cheese is still melty, garnished with fresh cilantro, diced tomatoes, or extra chipotle crema if desired.
Notes
- Use the largest flour tortillas you can find for easier folding and rolling.
- Shred cheese fresh from the block rather than using pre-shredded for better melting.
- Don’t overfill the quesadillas – they should look slightly underfilled before folding.
- Leftovers reheat well in a covered pan over low heat to remelt the cheese.
Frequently asked questions about making quesaritos
Q: Can I make quesaritos ahead of time?
A: Yes, you can assemble quesaritos up to 4 hours ahead and store them wrapped in foil in the refrigerator. Reheat in a covered pan over low heat to remelt the cheese without burning the tortilla.
Q: What if I can’t find large enough tortillas?
A: Look for burrito-sized tortillas (10-12 inches) in the bakery section or Hispanic foods aisle. In a pinch, you can use two smaller tortillas overlapped slightly, but larger ones work much better for folding.
Q: Can I use different proteins instead of ground beef?
A: Absolutely! Seasoned chicken, carnitas, or even black beans work great. Just make sure whatever protein you use is well-seasoned and not too wet, which can make the tortilla soggy.
Q: How do I prevent the quesarito from falling apart when I eat it?
A: Don’t overfill it, make sure your quesadilla base is fully cooked and crispy, and fold it tightly with the seam on the bottom. Eating it immediately while the cheese is still melted also helps hold everything together.