 (1)")

Most people think they know how to make a grilled cheese sandwich, but there’s a game-changing secret that transforms this simple comfort food into something extraordinary. The trick involves adding grated cheese to the outside of the buttered bread, creating an impossibly crispy, golden crust that’s packed with cheesy goodness. This technique, spotted at trendy restaurants across the country, is surprisingly easy to master at home and will make your grilled cheese the talk of any dinner table.
Most people skip the crucial cheese-on-butter step
The secret to creating that restaurant-quality crispy crust lies in a simple but brilliant technique: sprinkling grated cheese directly onto the buttered exterior of your bread. After spreading softened butter on the outside of each slice, you press a small amount of freshly grated cheese into the butter. This creates a foundation that will transform into a golden, crispy shell when it hits the hot pan.
This method works because the cheese essentially fries in the butter, creating a delicate, lacy crust that’s both crunchy and intensely cheesy. The Pioneer Woman discovered this technique at a Los Angeles restaurant called Stir Market, where they served grilled cheese with cheese “inside, outside, over, under, and all around.” The result is a sandwich that’s crispy from the inside out, with layers of cheese in every single bite.
Grating your own cheese makes all the difference
Pre-shredded cheese might seem convenient, but it’s coated with anti-caking agents that prevent proper melting and crisping. When you grate cheese fresh from the block, it melts more evenly and creates that perfect crispy exterior you’re after. Sharp cheddar works beautifully for this technique, but mixing cheeses like cheddar and Monterey Jack creates even more complex flavors and better melting properties.
The key is using enough grated cheese to stick to the butter but not so much that it burns before the inside melts. About a tablespoon per slice gives you that perfect balance of crispiness without overwhelming the sandwich. Freshly grated cheese melts quicker and more evenly than sliced cheese, which means your bread will toast and your cheese will melt at exactly the same time.
The bread choice can make or break your sandwich
Regular soft sandwich bread simply can’t handle the extra moisture and weight that comes with this cheese-crusted technique. The bread needs to be sturdy enough to support multiple layers of cheese while maintaining its structure. Sourdough is the gold standard here because its tangy flavor complements the rich cheese, and its dense texture won’t get soggy under pressure.
Crusty French or Italian bread also works wonderfully, providing a substantial base that won’t fall apart when loaded with cheese. The key is avoiding anything too soft or airy that might collapse or become mushy. A good test is whether the bread can hold its shape when you press down on it gently – if it springs back, it’s perfect for this technique.
Fresh basil adds an unexpected gourmet touch
While the cheese crust is the star of this sandwich, adding fresh basil between the cheese layers transforms it into something truly special. The herb’s bright, aromatic flavor cuts through the richness of all that melted cheese, creating a more balanced and sophisticated taste. The trick is cutting the basil into thin ribbons, called chiffonade, which distributes the flavor evenly without creating bulky spots.
To properly chiffonade basil, stack the leaves on top of each other, roll them tightly into a log shape, then slice through the roll as finely as possible. This cutting technique preserves the basil’s taste without unnecessarily bruising the delicate leaves. The combination of fresh basil and melted cheese creates that classic caprese flavor profile that makes this grilled cheese feel restaurant-worthy.
Temperature control prevents burnt outsides and cold centers
The biggest mistake people make with this technique is cooking over heat that’s too high. With all that extra cheese on the outside, the sandwich can go from golden brown to burnt in seconds. Medium-low heat is essential for giving the cheese time to melt completely while the exterior develops that perfect crispy crust. Think slow and steady rather than fast and fierce.
The sandwich typically needs 3-5 minutes on the first side and about 2 minutes on the second side, but keep checking to make sure it’s not browning too quickly. If the outside is getting dark before the cheese inside is melted, turn the heat down and cover the pan with a lid for a minute to help the interior catch up. A nonstick or well-seasoned cast iron skillet works best for preventing sticking and ensuring even browning.
Room temperature butter spreads without tearing bread
Cold butter is the enemy of good grilled cheese because it tears the bread and creates uneven coverage. Room temperature butter spreads smoothly and evenly, creating the perfect base for that exterior cheese to stick to. If you forget to take your butter out ahead of time, you can soften it quickly by cutting it into small pieces and letting it sit near a warm stove for a few minutes.
The amount of butter matters too – you want enough to create that golden crust but not so much that the sandwich becomes greasy. About a tablespoon total is usually perfect for two slices of bread. Spread it thin and even, making sure to get all the way to the edges so every bit of the sandwich gets that beautiful golden color.
The two-minute cooling trick prevents soggy bottoms
Here’s something most people don’t realize: placing a hot grilled cheese directly on a plate immediately ruins all that crispy work you just did. Steam gets trapped underneath the sandwich, creating condensation that makes the bottom soggy and limp. It’s heartbreaking to bite into what looks like a perfect grilled cheese only to find the bottom has turned into a mushy mess.
The solution is surprisingly simple: let the sandwich rest on a wire rack for about two minutes before serving. This elevated position allows air to circulate around the entire sandwich, letting steam escape without creating that dreaded soggy bottom. If you don’t have a wire rack, you can even use two chopsticks placed under the sandwich to lift it off the plate.
Layering cheese properly ensures even melting
The secret to perfectly melted cheese throughout the sandwich lies in the layering technique. Start with one slice of cheese on the bottom piece of bread, add your basil or other fillings, then top with another slice of cheese before adding the top piece of bread. This sandwich method ensures the fillings stay put and the cheese melts evenly from both sides toward the center.
Some people make the mistake of piling all the cheese in the middle, which creates uneven melting and can cause the fillings to slide out. The two-layer approach creates a more stable structure and ensures every bite has the perfect ratio of bread, cheese, and any added ingredients. This technique works especially well when you’re mixing different types of cheese for more complex flavor profiles.
Timing the flip prevents cheese from escaping
Knowing when to flip your grilled cheese is crucial, especially with this cheese-crusted version. The first side needs enough time to develop that golden, crispy exterior, but flip too late and you risk burning. Look for a deep golden brown color and listen for the gentle sizzling that indicates the cheese is properly caramelizing against the pan.
When you do flip, use a wide spatula and move confidently but carefully. The exterior cheese can make the sandwich a bit more delicate than a regular grilled cheese, so support it fully during the flip. If some of the exterior cheese sticks to the pan, don’t worry – that’s normal and actually creates those deliciously crispy cheese bits that you can scrape up and eat as a cook’s treat.
This cheese-crusted grilled cheese technique might seem like a small change, but it transforms an everyday sandwich into something truly special. The combination of crispy exterior cheese, perfectly melted interior, and fresh herbs creates layers of texture and flavor that will make you wonder why you ever made grilled cheese any other way. Once you try this method, regular grilled cheese will never quite satisfy you again.
Crispy Grilled Cheese With Cheese Crust
Course: Lunch Recipes1
servings5
minutes7
minutes450
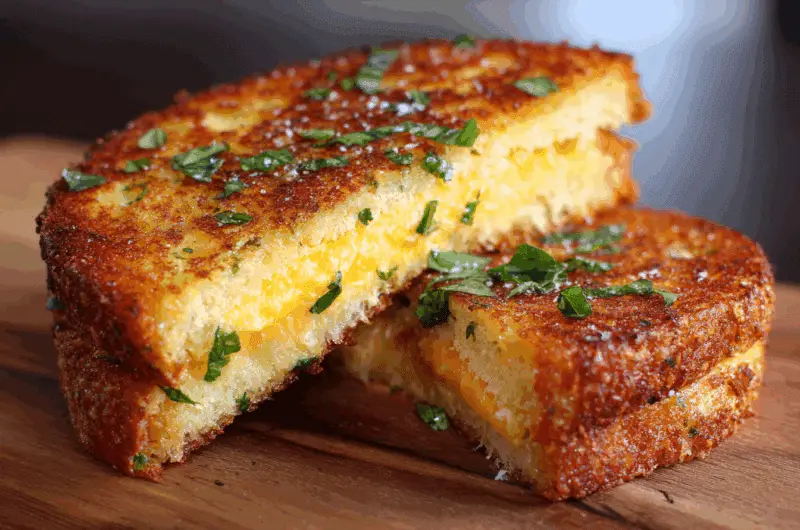
kcalThis restaurant-style grilled cheese features a secret crispy cheese crust on the outside and perfectly melted cheese with fresh basil on the inside.
Ingredients
2 slices sourdough bread or crusty French bread
1 tablespoon salted butter, at room temperature
1/2 cup sharp cheddar cheese, freshly grated
1/4 cup Monterey Jack cheese, freshly grated
5 fresh basil leaves
Directions
- Prepare the bread by laying both slices on your work surface. Spread half the softened butter on what will be the outside of your sandwich, making sure to get an even layer all the way to the edges. Repeat with the second slice, buttering the outside surface that will face the pan.
- Mix the grated cheddar and Monterey Jack cheeses in a small bowl. Sprinkle about 2 tablespoons of the cheese mixture onto each buttered surface, pressing gently to help it stick to the butter. This will create your crispy cheese crust when cooked.
- Stack the basil leaves on top of each other and roll them tightly into a log shape. Using a sharp knife, slice through the roll as finely as possible to create thin ribbons (chiffonade). This technique prevents bruising the basil and distributes the flavor evenly throughout the sandwich.
- Turn one slice of bread over so the cheese-coated butter side faces down. Layer half of the remaining cheese mixture on top, add the basil ribbons, then top with the rest of the cheese. Place the second slice of bread on top with the buttered, cheese-coated side facing up.
- Heat a nonstick or cast iron skillet over medium-low heat for about 2 minutes. The temperature is crucial – too hot and the exterior cheese will burn before the interior melts. Test the heat by sprinkling a tiny bit of cheese in the pan; it should sizzle gently without immediately browning.
- Carefully place the sandwich in the preheated pan and cook for 3-5 minutes on the first side. Watch for the exterior cheese to turn golden brown and crispy, and listen for gentle sizzling. Don’t move the sandwich during this time – let that cheese crust develop properly.
- Using a wide spatula, carefully flip the sandwich and cook the second side for 2-3 minutes until golden brown and crispy. If the exterior is browning too quickly but the cheese inside isn’t melted, reduce heat and cover the pan with a lid for a minute to help the interior catch up.
- Remove the sandwich from the pan and place it on a wire rack for 2 minutes before serving. This prevents the bottom from getting soggy due to trapped steam. The brief rest also allows the cheese to cool slightly and firm up, preventing it from oozing out when you cut into it.
Notes
- Always use room temperature butter for easy spreading without tearing the bread
- Freshly grated cheese melts much better than pre-shredded cheese, which contains anti-caking agents
- If you don’t have a wire rack, place two chopsticks under the sandwich to elevate it and prevent sogginess
Frequently Asked Questions
Q: Can I use pre-shredded cheese for this recipe?
A: While you can use pre-shredded cheese in a pinch, freshly grated cheese works much better for this technique. Pre-shredded cheese is coated with anti-caking agents that prevent it from melting smoothly and developing that perfect crispy crust. The extra few minutes spent grating your own cheese will make a noticeable difference in the final result.
Q: What if I don’t have fresh basil?
A: You can skip the basil entirely for a classic cheese-crusted grilled cheese, or substitute other fresh herbs like oregano or thyme. Dried herbs don’t work as well in this application since they can burn during cooking. Other great additions include thin slices of tomato, caramelized onions, or even crispy bacon.
Q: My exterior cheese is burning before the inside melts – what am I doing wrong?
A: Your heat is too high. This technique requires patience and medium-low heat to give the interior cheese time to melt while the exterior develops that golden crust. If this happens, reduce the heat immediately and cover the pan with a lid for a minute to help the center catch up without burning the outside further.
Q: Can I make this sandwich ahead of time?
A: Grilled cheese sandwiches are best eaten immediately after cooking. The crispy exterior will become soft and soggy if stored, even for a short time. However, you can prep your ingredients ahead – grate the cheese, chiffonade the basil, and have your butter at room temperature so assembly and cooking goes quickly when you’re ready to eat.