 (1)")

What if everything you knew about chicken dinner was wrong? Most people think great chicken requires fancy ingredients or complicated techniques, but this garlic butter chicken proves that four simple ingredients can create restaurant-quality results. The secret isn’t in exotic spices or expensive cuts – it’s in understanding how butter, garlic, stock, and fresh herbs work together to transform ordinary chicken into something extraordinary that’ll have your family asking for the recipe.
Room temperature chicken makes all the difference
Cold chicken straight from the fridge is the biggest mistake home cooks make. When frozen or cold chicken hits hot oil, the proteins seize up immediately, creating that rubbery texture nobody wants. The temperature shock causes the muscle fibers to contract rapidly, squeezing out moisture and leaving you with dry, chewy meat. Professional chefs always let their protein come to room temperature before cooking.
Taking chicken out 30 minutes before cooking allows the proteins to relax and cook more evenly. Room temperature chicken also cooks faster and more consistently, preventing that common problem where the outside is overcooked but the center remains underdone. This simple step transforms tough, disappointing chicken into tender, juicy perfection every single time.
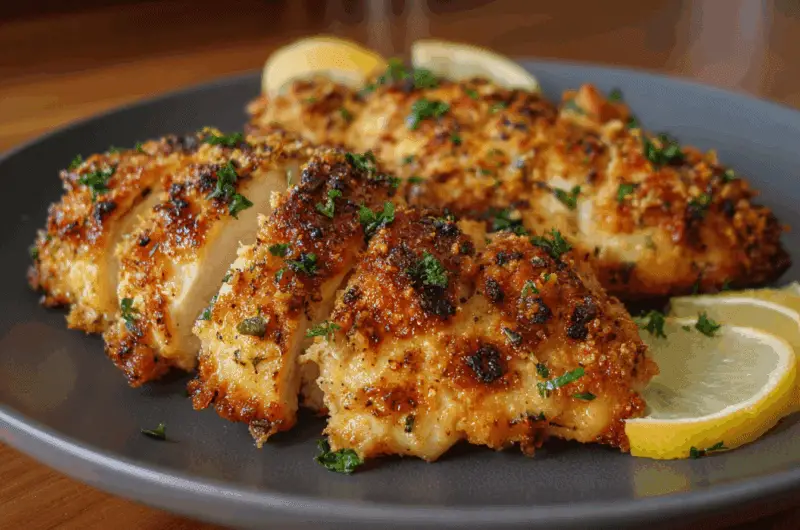
Butterflying chicken breasts saves dinner
Thick chicken breasts are the enemy of even cooking. The thick end takes forever to cook through while the thin end turns into leather. Butterflying solves this problem by creating uniform thickness across the entire piece. Using a sharp knife, slice horizontally through the middle of the breast, opening it like a book without cutting completely through.
This technique cuts cooking time in half and ensures every bite is perfectly done. Butterflied breasts cook in just 3-5 minutes per side instead of the usual 8-10 minutes. The uniform thickness means no more guessing if the center is done, and the increased surface area allows more of that gorgeous garlic butter sauce to cling to each piece.
Flour dredging creates sauce magic
Skipping the flour step means missing out on the best part of this dish. Dredging chicken in seasoned flour isn’t just about coating – it’s about creating a foundation for sauce adhesion. The thin flour layer crisps up during cooking, providing texture contrast and acting like a sponge for the butter sauce that follows.
Mix flour with garlic powder, salt, and pepper for maximum impact. The seasoned flour adds an extra layer of taste while the proteins in flour help bind the sauce to the meat. Proper dredging means pressing the flour into the chicken, shaking off excess, then letting it sit for a few minutes before cooking. This creates that perfect golden crust that makes restaurant chicken so appealing.
The four ingredient sauce that changes everything
Fancy sauces with twenty ingredients often taste muddy and confused. This four-ingredient sauce proves that simplicity wins every time. Unsalted butter provides richness and body, chicken stock creates the base and helps deglaze the pan, minced garlic brings aromatic punch, and fresh parsley adds brightness that cuts through the richness.
The magic happens in the pan after cooking the chicken. Those browned bits stuck to the bottom contain concentrated chicken essence that becomes the foundation of your sauce. Chicken stock deglazes these precious fond bits while butter creates an emulsion that coats everything in silky richness. Fresh herbs must be added at the end to preserve their bright color and fresh taste.
Pan selection affects your final results
Non-stick pans seem convenient but they’re actually working against you here. Those browned bits that create incredible sauce won’t form properly on non-stick surfaces. Stainless steel or cast iron pans allow proper browning and fond development, which becomes the flavor base for your sauce. The slight sticking is actually beneficial for building layers of taste.
Heavy-bottomed pans distribute heat evenly, preventing hot spots that burn garlic before the chicken finishes cooking. The thermal mass helps maintain consistent temperature when you add cold stock, preventing the sauce from breaking. Proper pan selection makes the difference between amateur results and professional-quality chicken that rivals expensive restaurants.
Butter temperature determines sauce success
Cold butter added to hot stock creates an unstable emulsion that breaks into greasy pools. Room temperature butter incorporates smoothly, creating that glossy, restaurant-quality finish. The key is whisking constantly as the butter melts, allowing the milk proteins to bind with the stock and create a cohesive sauce.
Unsalted butter gives you complete control over seasoning levels, while salted butter can make the final dish too salty when combined with seasoned flour and stock. Proper emulsification happens when you whisk vigorously while adding butter piece by piece. The sauce should turn slightly cloudy and coat the back of a spoon when properly made.
Fresh herbs beat dried every single time
Dried herbs in quick sauces taste dusty and lifeless because they need long cooking times to rehydrate and release flavor. Fresh parsley, thyme, or rosemary added at the end provide bright, clean taste that complements the rich butter without competing with the garlic. The brief cooking time isn’t enough for dried herbs to contribute meaningful flavor.
Parsley works best because it’s mild enough to let garlic shine while adding color and freshness. Stronger herbs like rosemary or thyme work too, but start with smaller amounts since they can overpower the delicate balance. Fresh herbs should be chopped just before using to prevent oxidation and maintain maximum potency. Never add them too early or they’ll turn brown and bitter.
Timing prevents overcooking disasters
Chicken continues cooking from residual heat even after removing from the pan, which means perfect timing is crucial. The moment your chicken reaches 165°F internal temperature, it needs to come out. Leaving it in the pan “just to be safe” guarantees overcooked, dry meat that no amount of sauce can fix.
Remove chicken before making the sauce, then add it back briefly just to warm through and coat with sauce. This prevents overcooking while ensuring the meat absorbs some of that gorgeous garlic butter. Proper timing means watching for visual cues – golden brown exterior and firm spring-back when pressed. A quick baste at the end distributes sauce evenly without additional cooking time.
Lemon transforms rich sauce into perfect balance
Rich butter sauce can feel heavy without acid to cut through the richness. A squeeze of fresh lemon juice brightens the entire dish and makes it feel lighter and more balanced. The acid also helps cleanse the palate between bites, preventing that overwhelming richness that makes you stop eating after a few forkfuls.
Never add lemon directly to the pan because acid breaks butter emulsions. Instead, serve lemon wedges alongside the dish so each person can add their preferred amount. Fresh lemon juice added just before eating maintains the sauce integrity while providing that essential brightness. The contrast between rich, garlicky butter and bright citrus creates a more complex, restaurant-worthy experience.
This garlic butter chicken proves that impressive doesn’t have to mean complicated. With proper technique and quality ingredients, a simple weeknight dinner becomes something special enough to serve to guests. The combination of crispy, seasoned exterior and silky, aromatic sauce creates the kind of memorable meal that turns cooking from chore into pleasure.
Famous Garlic Butter Chicken
Course: Dinner4
servings10
minutes20
minutes337
kcalTransform ordinary chicken into restaurant-quality perfection with this simple four-ingredient sauce that creates crispy, golden chicken coated in silky garlic butter.
Ingredients
2 large chicken breasts (9oz/250g each), brought to room temperature
1/4 cup plain all-purpose flour
1 teaspoon garlic powder
1 teaspoon salt, plus more to taste
1/2 teaspoon black pepper, plus more to taste
6 tablespoons unsalted butter, divided
1 tablespoon olive oil
1/2 cup chicken stock
2 cloves garlic, minced
1 tablespoon fresh parsley, finely chopped
1 lemon, cut into wedges for serving
Directions
- In a shallow dish, combine flour with garlic powder, salt, and black pepper. Mix well to ensure even distribution of seasonings. This seasoned flour will create a flavorful crust and help the sauce adhere to the chicken.
- Butterfly each chicken breast by slicing horizontally through the center, opening like a book but not cutting completely through. This creates four even pieces that cook uniformly. Press each piece firmly into the seasoned flour, coating both sides completely.
- Heat 1 tablespoon butter and olive oil in a large stainless steel or cast iron pan over medium-high heat. When the butter foams and begins to turn golden, add the floured chicken pieces. Cook for 3-5 minutes per side until golden brown and internal temperature reaches 165°F.
- Remove chicken from pan and set aside on a warm plate. Reduce heat to medium and add minced garlic to the same pan. Cook for 1-2 minutes until fragrant but not browned, stirring constantly to prevent burning.
- Pour chicken stock into the pan and scrape up any browned bits from the bottom using a wooden spoon. These fond bits contain concentrated flavor that will enhance your sauce. Let the stock simmer for 1-2 minutes to reduce slightly.
- Add remaining 5 tablespoons of butter to the pan, whisking constantly as it melts to create a smooth emulsion. The sauce should turn slightly cloudy and coat the back of a spoon. Season with salt and pepper to taste.
- Stir in fresh parsley and return chicken to the pan briefly, just long enough to warm through and coat with sauce. Baste each piece generously with the garlic butter using a spoon, ensuring even coverage.
- Serve immediately with lemon wedges on the side and extra sauce drizzled over the top. The acid from fresh lemon juice cuts through the richness and brightens the entire dish when squeezed over just before eating.
Notes
- Use unsalted butter for better control over seasoning levels – salted butter combined with seasoned flour and stock can make the dish too salty
- Don’t skip bringing chicken to room temperature – cold chicken will seize up and become tough when it hits hot oil
- Fresh herbs are essential for this quick sauce – dried herbs won’t have enough time to properly rehydrate and release flavor
- Never add lemon juice directly to the pan as it will break the butter emulsion – serve wedges on the side instead
- Use a stainless steel or cast iron pan rather than non-stick to develop proper fond for the sauce
Frequently Asked Questions
Q: Can I use boneless skinless chicken thighs instead of breasts?
A: Absolutely! Chicken thighs actually work better because they’re more forgiving and stay juicier. Cook them for the same amount of time, but they’ll be even more tender and flavorful than breasts.
Q: What if I don’t have fresh herbs available?
A: While fresh herbs work best, you can substitute with 1 teaspoon of dried thyme, oregano, or Italian seasoning. Add dried herbs earlier in the cooking process so they have time to rehydrate properly.
Q: Can I make this sauce ahead of time?
A: The sauce is best made fresh since butter emulsions can break when reheated. However, you can prep all ingredients beforehand and the actual cooking only takes 20 minutes from start to finish.
Q: Why does my sauce sometimes look greasy instead of creamy?
A: This happens when the butter gets too hot or isn’t whisked properly while melting. Keep heat at medium, add butter gradually, and whisk constantly to maintain the emulsion for that silky restaurant-quality finish.