 (1)")

Most people think making restaurant-quality pork tenderloin at home is impossible, but the secret isn’t fancy equipment or years of training. The real game-changer is understanding a few simple mistakes that turn what should be incredibly tender, juicy meat into something dry and disappointing. After trying countless methods, one approach consistently delivers results that make everyone at the table go quiet with that first bite.
Skipping the silver skin removal ruins everything
That shiny, translucent membrane covering your pork tenderloin isn’t just cosmetic – it’s the difference between tender meat and chewy disappointment. Silver skin doesn’t break down during cooking, no matter how long or how hot. Instead, it contracts and tightens, creating tough bands that make each bite feel like chewing rubber. Most home cooks either don’t know about this step or think it’s optional.
Removing silver skin takes practice, but the technique is straightforward. Slide a sharp boning knife under one end of the membrane, angling the blade slightly upward. Keep the knife almost parallel to the cutting board while pulling the silver skin tight with your other hand. Work in smooth, long strokes rather than sawing motions. Professional chefs emphasize this step because it’s impossible to fix later – once that meat is cooked with silver skin on, the damage is done.
Using basic seasoning instead of proper brining
Salt and pepper might work for a quick weeknight dinner, but they barely scratch the surface of what pork tenderloin can become. Brining transforms the meat from the inside out, breaking down proteins and allowing moisture to penetrate deep into the fibers. This isn’t just about adding salt – it’s about creating a chemical reaction that makes the meat hold onto juices during cooking. The difference between brined and unbrined pork tenderloin is so dramatic that most people think they’re eating different cuts of meat.
A proper brine needs three to four hours minimum, combining salt, brown sugar, and aromatics like bay leaves or juniper berries. The salt pulls moisture out initially, then the meat reabsorbs that liquid along with all the dissolved seasonings. Three tablespoons of salt and one-third cup of brown sugar dissolved in cold water creates the foundation. The meat should be completely submerged, covered, and refrigerated. After brining, pat the tenderloin completely dry before cooking – wet surfaces won’t brown properly.
Cooking at the wrong temperature kills the texture
Pork tenderloin is incredibly lean, which means it goes from perfect to overcooked in a matter of minutes. The old rule about cooking pork until it’s gray and dry comes from decades-old safety concerns that no longer apply. Modern pork is safe to eat at 145°F internal temperature, where it’s still slightly pink and incredibly juicy. Going beyond this temperature turns the meat into expensive shoe leather, no matter how perfectly everything else was executed.
The key is using high heat for a short time, starting with a sear in a hot pan to develop color and finishing in a 400°F oven. This two-step process ensures even cooking without overdoing the exterior. Professional techniques call for about 8-10 minutes in the oven after searing, but the only way to know for sure is using an instant-read thermometer. Let the meat rest for five minutes after cooking – this allows the juices to redistribute rather than running out all over the cutting board.
Missing the pan sauce opportunity
After searing pork tenderloin, that pan contains pure gold in the form of browned bits stuck to the bottom. These fond particles are concentrated meat essence that most home cooks either ignore or scrub away. Building a pan sauce from these drippings takes literally minutes but elevates the entire dish from good to restaurant-quality. The technique isn’t complicated, but it requires working while the pan is still hot and the fond is fresh.
Start with chopped shallots in the same pan, cooking until golden, then add fresh herbs like thyme or rosemary. Pour in about 14 ounces of good red wine – the alcohol will sizzle and steam, lifting those browned bits off the bottom. Reduce the wine by two-thirds, add beef stock, and thicken slightly with cornstarch mixed with water. Finish with cold butter whisked in just before serving. This sauce transforms simple pork into something special without requiring any exotic ingredients or techniques.
Slow cooker methods work for different results
While high-heat roasting creates beautiful browning and firm texture, slow cooking produces completely different but equally impressive results. The long, gentle heat breaks down connective tissue differently, creating meat so tender it falls apart with a fork. This method works especially well for busy schedules since everything goes into the pot in the morning and dinner is ready when needed. The trade-off is less browning and a softer texture that some people prefer.
Slow cooker pork tenderloin benefits from a simple liquid base combining beef broth, balsamic vinegar, and tamari or soy sauce. Adding honey and minced garlic creates complex depth without overwhelming the meat. Cook on low for 10-12 hours for maximum tenderness, or high for 6-8 hours if time is limited. The resulting liquid makes an excellent gravy when thickened with cornstarch, and the meat pairs beautifully with mashed potatoes or egg noodles to soak up all those juices.
Italian dressing creates surprisingly good results
Sometimes the best techniques are the simplest ones, and using Italian dressing as both marinade and cooking liquid proves this point. The combination of oil, vinegar, and herbs in bottled dressing does most of the work automatically, tenderizing the meat while adding layers of seasoning. This approach works especially well for weeknight dinners when time is limited but good results are still important. The acidity helps break down tough fibers while the oil keeps everything moist.
Combined with Dale’s Steak Seasoning, garlic salt, and Creole seasoning, Italian dressing creates a quick marinade that penetrates the meat during cooking. This method works best with thinner cuts or pork chops rather than whole tenderloins, cooking about five minutes per side in a hot skillet. The dressing prevents sticking while creating a flavorful coating that caramelizes beautifully. It’s not fancy, but it’s incredibly reliable and requires minimal prep work or specialized ingredients.
Mushroom and onion toppings add restaurant appeal
Plain pork tenderloin, even when cooked perfectly, can look a bit lonely on the plate. Sautéed mushrooms and onions not only add visual appeal but also provide contrasting textures and complementary tastes that make the entire dish more satisfying. The earthy mushrooms pair naturally with pork’s mild richness, while caramelized onions add sweetness that balances any saltiness from brining or seasoning. This combination appears on restaurant menus everywhere because it simply works.
Baby bella mushrooms work better than basic white mushrooms because they hold their shape during cooking and provide more intense taste. Slice them evenly and cook in the same pan used for the pork if possible, taking advantage of any remaining fond. Yellow onions should be diced and cooked until translucent before adding mushrooms and garlic. The entire topping process takes about seven minutes and can be done while the meat rests, making timing simple and efficient.
Side dish choices make or break the meal
Pork tenderloin produces delicious juices and sauces that shouldn’t be wasted on plates, which makes side dish selection crucial. Mashed potatoes remain the classic choice because they soak up every drop of pan sauce or cooking liquid. Yukon Gold potatoes create the creamiest texture, while russets provide more traditional results. Egg noodles offer similar sauce-absorbing properties with a different texture, and both options provide the starchy foundation that makes pork tenderloin feel like a complete meal.
Rice works well too, especially when the pork is cooked with Asian-inspired seasonings like soy sauce or ginger. For lower-carb options, cauliflower rice mimics the texture of regular rice while providing a neutral base for rich sauces. Roasted vegetables like carrots, Brussels sprouts, or green beans add color and nutrition without competing with the main dish. The key is choosing sides that complement rather than compete with the pork’s delicate nature.
Proper resting prevents juice loss
After spending time brining, seasoning, and cooking pork tenderloin perfectly, many home cooks sabotage their efforts by cutting into the meat immediately. Hot meat fibers are contracted and tight, holding juices under pressure. Cutting too soon releases all that moisture onto the cutting board instead of keeping it in the meat where it belongs. This single mistake can turn perfectly cooked pork into something dry and disappointing, wasting all the previous effort.
Five minutes of resting time allows the meat fibers to relax and reabsorb their juices, but this doesn’t mean the meat gets cold. Tenting loosely with foil helps retain heat while allowing steam to escape, preventing the surface from getting soggy. Professional kitchens use this technique religiously because it’s the difference between good meat and great meat. Use the resting time to finish side dishes, make pan sauce, or prepare plates. The wait is worth it when every slice stays moist and flavorful.
Perfect pork tenderloin isn’t about expensive ingredients or complicated techniques – it’s about understanding a few key principles and executing them consistently. Whether using the high-heat roasting method for maximum browning or the slow cooker approach for ultimate tenderness, success comes from paying attention to details like silver skin removal, proper seasoning, and accurate temperatures. The reward is restaurant-quality meat that costs a fraction of dining out and impresses everyone at the table every single time.
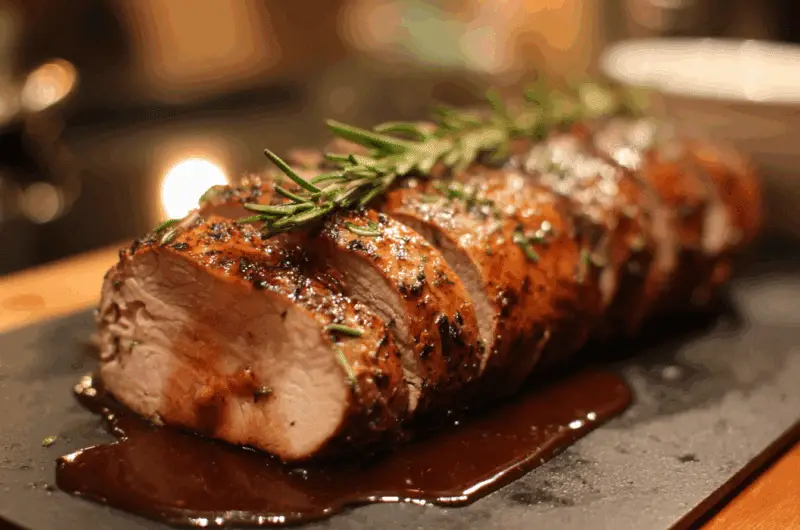
Perfect Brined Pork Tenderloin with Red Wine Sauce
Course: Dinner Recipes4
servings15
minutes25
minutes320
kcalThis restaurant-quality pork tenderloin uses a simple brine to create incredibly tender, juicy meat that melts in your mouth.
Ingredients
1 large pork tenderloin (about 1½ pounds), silver skin removed
3 tablespoons salt
1/3 cup brown sugar
1 quart cold water
2 bay leaves
2 tablespoons chopped shallots
14 ounces good red wine (Cabernet or Shiraz)
3/4 cup beef stock
3-5 tablespoons cold butter
Directions
- Prepare the brine by dissolving salt, brown sugar, and bay leaves in cold water in a container large enough to submerge the tenderloin completely. Place the cleaned pork tenderloin in the brine, cover, and refrigerate for 3-4 hours. This step is crucial for creating incredibly tender, juicy meat.
- Remove tenderloin from brine and pat completely dry with paper towels – this is essential for proper browning. Preheat your oven to 400°F and season the dried tenderloin with freshly cracked black pepper. Heat clarified butter or cooking oil in an oven-safe sauté pan to 365°F.
- Sear the tenderloin on all sides until golden brown, turning carefully to develop color evenly. This should take about 6-8 minutes total, creating a beautiful crust that locks in juices. Transfer the pan directly to the preheated oven.
- Roast for 8-10 minutes or until internal temperature reaches 145°F for perfect pink color and juicy texture. Remove from oven and transfer meat to a cutting board, tenting loosely with foil. Let rest for 5 minutes while preparing the sauce – this resting period is crucial for juicy slices.
- Using the same pan with all the browned bits, add chopped shallots and cook over medium heat for 2-3 minutes until light golden brown. Add fresh herbs like thyme or rosemary if desired, then pour in the red wine. The wine will sizzle and steam, lifting those flavorful browned bits from the bottom.
- Bring wine to a boil and reduce by two-thirds until approximately 5-6 ounces remain, concentrating the taste. Add beef stock and bring to a boil again. Mix 1 tablespoon cornstarch with 2 tablespoons cold water and stir into the sauce to thicken slightly.
- Remove sauce from heat and whisk in cold butter one tablespoon at a time until glossy and smooth. Season with salt and pepper to taste. Strain the sauce if you prefer it completely smooth, or leave the solids for a more rustic presentation.
- Slice the rested tenderloin into medallions about 1/2 inch thick, cutting against the grain for maximum tenderness. Arrange on warm plates and spoon the red wine sauce over and around the meat. Serve immediately with your choice of mashed potatoes, egg noodles, or rice to soak up the delicious sauce.
Notes
- Removing silver skin is crucial – use a sharp boning knife and work in smooth, long strokes rather than sawing motions
- Don’t skip the brining step as it’s what makes this tenderloin incredibly tender and juicy
- Use an instant-read thermometer to avoid overcooking – 145°F is perfect for juicy, slightly pink pork
- The resting period is essential – cutting too soon will release all the juices onto the cutting board
- Juniper berries can be added to the brine for extra depth but are optional
Frequently Asked Questions
Q: Can I skip the brining step if I’m short on time?
A: While you can cook pork tenderloin without brining, the results won’t be nearly as tender or juicy. The brining process is what transforms ordinary pork into restaurant-quality meat that melts in your mouth. If time is limited, even a 1-2 hour brine will make a noticeable difference.
Q: What’s the best way to tell when pork tenderloin is done cooking?
A: Always use an instant-read thermometer inserted into the thickest part of the meat. Pork tenderloin is perfectly cooked at 145°F internal temperature, where it’s still slightly pink and incredibly juicy. Visual cues can be misleading, so the thermometer is your best friend.
Q: Can I make this recipe in a slow cooker instead of the oven?
A: Yes, slow cooker pork tenderloin works beautifully but creates different results. Use beef broth, balsamic vinegar, soy sauce, honey, and garlic as your cooking liquid. Cook on low for 10-12 hours or high for 6-8 hours. The meat will be fall-apart tender but won’t have the beautiful browned crust.
Q: How do I remove silver skin without wasting meat?
A: Use a sharp boning knife and work slowly. Slide the knife under one end of the silver skin, keeping the blade almost parallel to the cutting board. Pull the membrane tight with your other hand and work in smooth, long strokes. It takes practice, but you’ll waste less meat as you get better at the technique.