 (1)")

Nothing beats the disappointment of biting into a piece of grilled chicken that tastes like cardboard. Most people think they know how to grill chicken, but the reality is that perfectly juicy, tender chicken breasts are surprisingly tricky to master. The good news? Once you understand the key techniques that separate amazing grilled chicken from the dry, flavorless stuff, you’ll never go back to your old methods again.
Pounding chicken makes all the difference
Chicken breasts have an annoying natural shape that makes even cooking nearly impossible. One end is thick and meaty while the other tapers to almost nothing. When you throw these uneven pieces on the grill, the thin parts turn into leather while the thick sections are still raw inside. The solution seems obvious once you know it, but most home cooks skip this crucial step entirely.
Place each chicken breast in a zip-lock bag and use a meat mallet, rolling pin, or even a heavy saucepan to pound them to an even half-inch thickness. This simple technique not only ensures uniform cooking but also breaks down tough muscle fibers, making the meat more tender. The whole process takes maybe five minutes, but it’s the difference between restaurant-quality chicken and the dry disappointments most people serve.
Lemon juice ruins chicken texture completely
Here’s where most people mess up their marinade without even knowing it. Traditional wisdom says acidic ingredients like lemon juice or vinegar tenderize meat, but that’s completely wrong when it comes to lean chicken breasts. These acids actually “cook” the outer layer of the meat, creating a tough, leathery texture that no amount of grilling can fix. It’s like making ceviche when you wanted juicy grilled chicken.
Instead of lemon juice, use only the zest from fresh lemons in your marinade. The zest provides all that bright, citrusy flavor without the texture-destroying acids. Mix it with olive oil, minced garlic, dried herbs like thyme and oregano, salt, and pepper for a marinade that works instead of against your chicken. The oil helps carry flavors into the meat while keeping everything moist during the high-heat grilling process.
Twenty minutes beats overnight marinating every time
Forget everything you’ve heard about marinating chicken overnight or for hours on end. Lean chicken breasts don’t need extended marinating time, and longer isn’t better in this case. Over-marinating can actually break down the protein structure too much, leaving you with mushy, unappetizing meat that falls apart on the grill. Plus, who has time to plan their dinner 24 hours in advance?
A good marinade penetrates thin, pounded chicken breasts in just 20 to 30 minutes. That’s enough time to infuse flavor without compromising texture. If you want to prep ahead, you can marinate for up to two hours maximum, but anything beyond that is overkill. This quick marinating approach means you can decide to grill chicken on a whim and still get incredible results without the advance planning.
Two-zone grilling prevents burnt outsides and raw centers
Most backyard grillers crank everything to high and hope for the best, which explains why so much grilled chicken comes out charred on the outside and still pink in the middle. The secret is creating two distinct heat zones on your grill. Set one side to high heat for searing and getting those Instagram-worthy grill marks, while keeping the other side on medium or low for gentle finishing.
Start by searing the chicken on the hot side for 3-5 minutes until you get good grill marks, then move it to the cooler side to finish cooking through. This two-zone method gives you the best of both worlds: beautiful caramelization from the high heat and gentle, even cooking that keeps the meat juicy. Close the lid during the finishing phase to create convection heat that cooks the chicken evenly from all sides.
Overcooking happens faster than most people realize
Pounded chicken breasts cook incredibly fast, and the window between perfectly done and overcooked is surprisingly narrow. We’re talking about 2-3 minutes per side for properly flattened breasts. Most people leave chicken on the grill way too long because they’re scared of undercooking it, but an instant-read thermometer takes all the guesswork out of the equation.
Pull the chicken when it hits 160°F internally, then tent it with foil and let it rest. The temperature will climb to the safe 165°F during the resting period, but the meat will stay juicy instead of turning into sawdust. If you try to flip the chicken and it feels stuck to the grates, give it another 30 seconds – properly seared chicken releases naturally when it’s ready to turn.
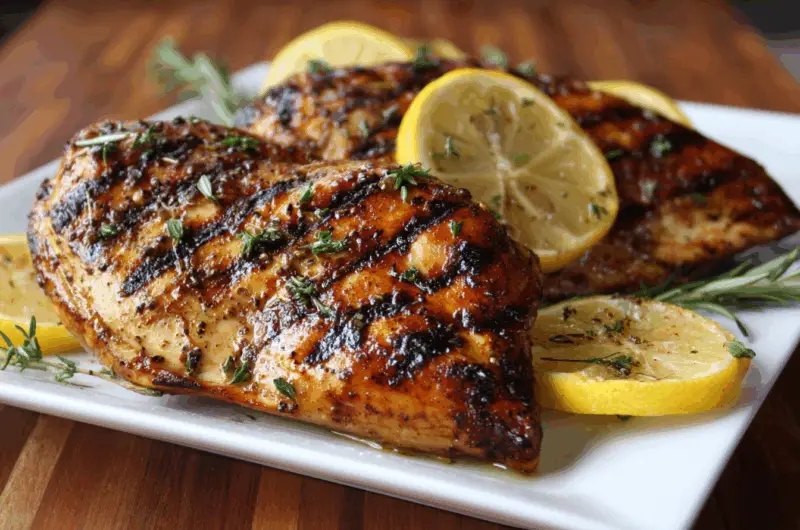
Clean, oiled grates make perfect grill marks
Nothing ruins the presentation of grilled chicken like pieces that stick to dirty grates and tear apart when you try to flip them. Proper grate preparation is non-negotiable if you want professional-looking results. Start with a clean grill – use a grill brush to scrape away any leftover bits from your last cookout, then heat the grill to burn off any remaining residue.
Once the grates are hot and clean, oil them carefully using tongs and a paper towel soaked in high-heat oil like avocado oil. Be cautious because the oil can drip and cause flare-ups. Well-oiled grates create those perfect diamond grill marks that make your chicken look like it came from a restaurant kitchen. The oil also helps create a better sear, which locks in juices and adds that caramelized flavor that makes grilled chicken so appealing.
Resting time keeps all the juices inside
The biggest mistake people make after perfectly grilling their chicken is cutting into it immediately. When you slice hot meat straight off the grill, all those carefully preserved juices flow out onto the cutting board instead of staying in the meat where they belong. It’s like watching all your hard work literally drain away in front of your eyes.
Let the chicken rest for 5-10 minutes under a loose tent of aluminum foil before slicing. This allows the muscle fibers to relax and reabsorb the juices, ensuring every bite is moist and flavorful. The timing works out perfectly because it gives you just enough time to get sides plated and everything else ready. Save any juices that do accumulate on the plate during resting – they make an excellent natural sauce to drizzle over the sliced chicken.
High heat throughout the process is essential
Many home cooks are afraid of high heat, thinking it will dry out their chicken, but the opposite is actually true. High heat creates the Maillard reaction – that beautiful browning and caramelization that locks in moisture and creates complex flavors. Low heat just slowly dehydrates the meat without giving you any of those delicious browned bits that make grilled chicken taste amazing.
Your grill should be screaming hot when the chicken goes on – we’re talking 450°F or higher on the hot side. This intense heat quickly sears the outside, creating a barrier that helps keep the interior juicy. The covered grilling technique creates convection heat that cooks the chicken evenly while maintaining that high-heat sear. Don’t worry about the chicken cooking too fast; properly pounded breasts are thin enough that they’ll cook through quickly without drying out at high temperatures.
Simple seasonings work better than complex marinades
The temptation is to throw every spice in the cabinet into your marinade, thinking more ingredients equals more flavor. But chicken breasts have a delicate taste that gets overwhelmed by complicated seasoning blends. The best marinades use just a few high-quality ingredients that complement rather than mask the natural chicken flavor.
Stick to classics like olive oil, garlic, lemon zest, dried herbs, salt, and pepper. Maybe add a touch of honey or maple syrup for caramelization. These simple ingredients work together harmoniously and let the chicken shine through. You can always add more complex sauces or seasonings after grilling, but you can’t take away an overpowering marinade. The best chicken tastes like perfectly seasoned chicken, not like a spice rack explosion.
Perfect grilled chicken isn’t about fancy equipment or secret ingredients – it’s about understanding a few key techniques and executing them consistently. Once you master these fundamentals, you’ll never have to suffer through another piece of dry, flavorless chicken again. Your family and friends will wonder what changed, and you can smile knowing it’s these simple but crucial techniques that make all the difference.
The Ultimate Juicy Grilled Chicken Breasts
Course: Main Course4
servings25
minutes10
minutes280
kcalThis recipe guarantees perfectly juicy, tender grilled chicken breasts every single time using simple techniques that prevent dryness.
Ingredients
1¾ lbs boneless, skinless chicken breasts
6 tablespoons extra virgin olive oil
4 large garlic cloves, minced
1 teaspoon dried thyme
½ teaspoon dried oregano
1¼ teaspoons salt
½ teaspoon freshly ground black pepper
1½ teaspoons lemon zest (from one lemon)
Lemon wedges for serving
Directions
- Place each chicken breast in a 1-gallon zip-lock bag one at a time. Using a meat mallet, rolling pin, or heavy saucepan, pound each breast to an even ½-inch thickness. This ensures uniform cooking and tenderizes the meat for maximum juiciness.
- In the same zip-lock bag (if still intact), combine olive oil, minced garlic, thyme, oregano, salt, pepper, and lemon zest. Mix all marinade ingredients thoroughly by massaging the bag. Add the pounded chicken breasts and massage the marinade into the meat until evenly coated.
- Seal the bag tightly and place it in a bowl to catch any potential leaks. Marinate the chicken in the refrigerator for 20-30 minutes minimum, or up to 2 hours maximum. Do not over-marinate as it can make the chicken mushy.
- Preheat your grill to high heat (450°F or higher). Clean the grates thoroughly with a grill brush, then carefully oil them using tongs and a paper towel soaked in high-heat oil. The grates should be very hot before adding the chicken.
- Remove chicken from marinade and shake off excess. Place chicken breasts on the hottest part of the grill and cook with the lid open for 3-5 minutes until good grill marks form. If the chicken sticks, wait another 30 seconds as it will release naturally when ready.
- Flip the chicken and move it to a cooler part of the grill (or reduce heat to medium). Close the lid and continue cooking for 2-5 more minutes until an instant-read thermometer reads 160°F in the thickest part. The internal temperature will rise to 165°F during resting.
- Transfer the chicken to a clean platter and tent loosely with aluminum foil. Let the chicken rest for 5-10 minutes to allow juices to redistribute throughout the meat. This resting period is crucial for maintaining moisture.
- Slice the chicken into thick pieces and arrange on serving plates. Pour any accumulated juices from the resting plate over the sliced chicken for extra flavor and moisture. Serve immediately with fresh lemon wedges on the side.
Notes
- Avoid using lemon juice in the marinade as the acid will make the chicken tough and leathery
- Don’t marinate longer than 2 hours or the chicken will become mushy from over-tenderizing
- Chicken can be frozen after cooking – wrap pieces individually in plastic wrap before freezing for easy single-serving portions
Frequently Asked Questions
Q: Can I use this recipe for bone-in chicken breasts?
A: Yes, but skip the pounding step and increase cooking time to 25-30 minutes total, using a two-zone grilling method with most cooking done on the cooler side.
Q: What if I don’t have a meat mallet for pounding?
A: A rolling pin, heavy saucepan, or even a wine bottle works perfectly for pounding chicken breasts to even thickness.
Q: How long can I store leftover grilled chicken?
A: Properly stored grilled chicken lasts 3-4 days in the refrigerator and up to 3 months in the freezer when wrapped individually.
Q: Can I make this recipe on a gas grill versus charcoal?
A: Absolutely! The technique works on both gas and charcoal grills – just ensure you create distinct hot and cool zones for proper cooking.