 (1)")

Most people throw their potatoes in the oven and hope for the best, but there’s actually a much better way to get that perfect crispy skin and fluffy inside. The truth is, that basic method everyone uses creates dry, dense potatoes that need tons of toppings just to taste good. But when someone figured out this amazing technique, everything changed. It turns out the secret isn’t just about temperature or timing—it’s about how you cut and prepare the potato before it even goes in the oven.
Why regular baking methods fall short
Think about the last baked potato you made at home. Chances are, you washed it, maybe poked it with a fork a few times, and stuck it in the oven for an hour or so. When you cut it open, the inside was probably packed tight and kind of dry, right? That’s because the traditional method doesn’t give the potato enough room to steam properly inside. The heat hits the outside, but the inside just kind of sits there getting dense and mealy instead of light and fluffy like it should be.
The problem gets even worse when people try to speed things up in the microwave. Sure, it’s faster, but microwaved potatoes end up with that rubbery texture and zero crispy skin. Even wrapping potatoes in foil, which seems like it should help, actually traps moisture against the skin and makes it soggy instead of crispy. After years of disappointing potatoes, most people just accept that’s how they turn out and load them up with butter, cheese, and bacon to mask the mediocre texture underneath.
The bloomin’ method changes everything
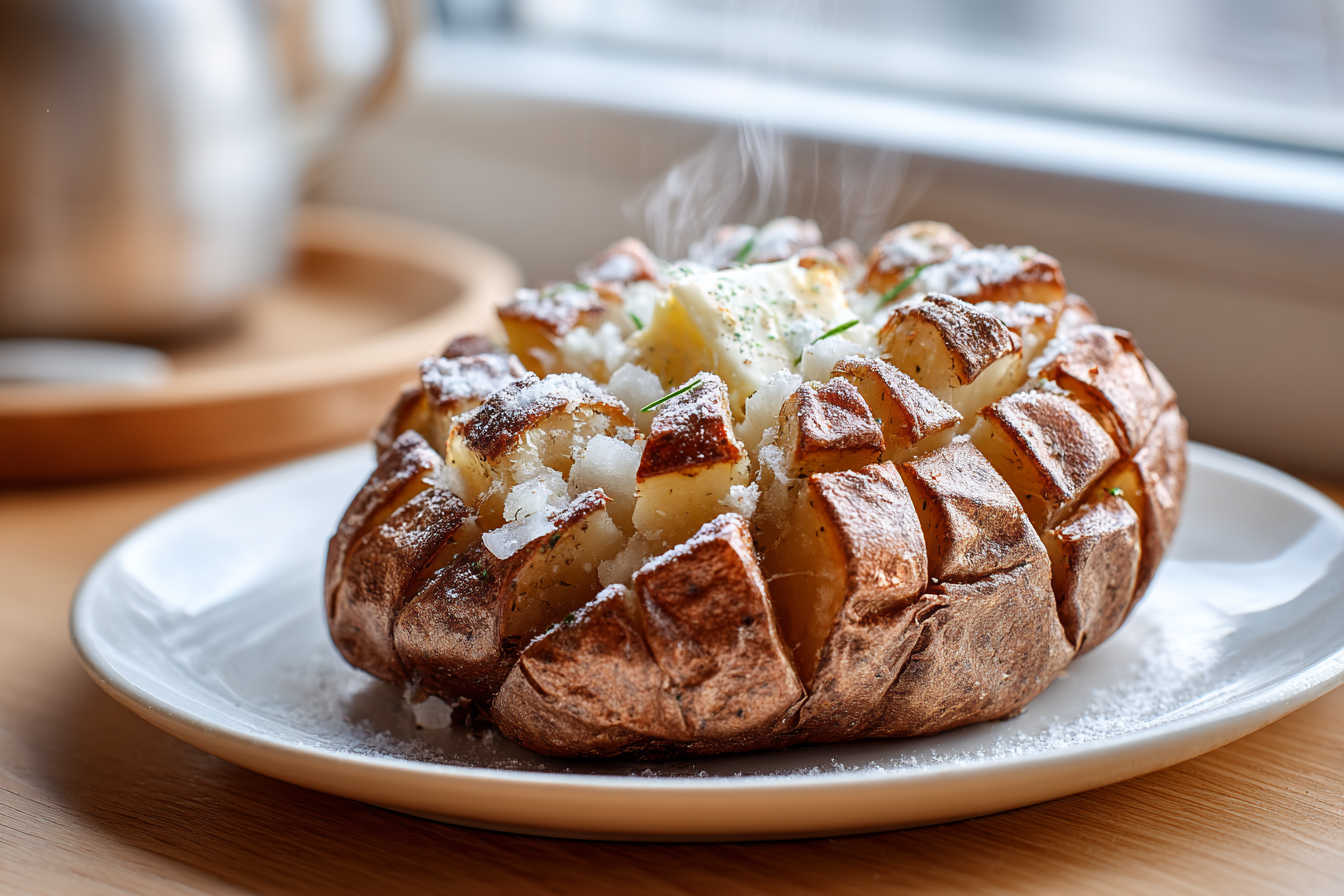
Instead of just slicing a simple cross on top of your potato, there’s something called the bloomin’ method that creates way better results. Named after those bloomin’ onion appetizers you see at restaurants, this technique involves cutting a grid pattern into the potato while leaving the bottom intact. You make parallel cuts going one direction, then turn the potato and make parallel cuts going the other direction. The cuts go deep but don’t go all the way through, so the potato stays together as one piece but opens up like a flower when it bakes.
This grid cutting method does something really smart—it creates tons of surface area inside the potato that can crisp up during baking. All those little cuts let steam escape properly, which is what makes the inside fluffy instead of dense. Plus, when you add toppings later, they fall down into all those crevices instead of just sitting on top. The technique takes a few extra minutes to prep, but the difference in the final result is absolutely worth it. Your potato ends up looking impressive too, like something from a fancy restaurant.
Salt baking creates the crispiest skin
Here’s another game changer most home cooks never try—baking your potato on a bed of salt instead of directly on the oven rack. This method requires a good amount of coarse salt, which seems wasteful at first, but the results speak for themselves. The salt draws out moisture from the potato skin as it bakes, creating an incredibly crispy exterior that you just can’t get any other way. The salt also seasons the skin perfectly, making it actually worth eating instead of leaving it on your plate.
To use this method, pour a thick layer of coarse salt (kosher or sea salt works great) into a baking dish. Nestle your prepared potatoes down into the salt so they’re sitting on it but not completely buried. The salt acts like a heat conductor, helping the potato cook more evenly on all sides. Some people worry about the potato getting too salty, but it really doesn’t—the salt stays on the outside skin and just enhances the natural potato taste. After baking, you can actually save and reuse the salt for your next batch of potatoes, so it’s not as wasteful as it seems.
Choosing the right potato matters more than you think
Not all potatoes work the same for baking, even though grocery stores sell them all next to each other. Russet potatoes are hands-down the best choice because they have high starch content and low moisture. That combination is exactly what you need for a fluffy interior. Their thick skin also gets nice and crispy when baked properly. Red potatoes and Yukon golds might look tempting, but they have more moisture and less starch, which means they end up waxier and denser when baked—better for boiling or roasting in chunks.
Size matters too when picking your potatoes. Look for medium to large russets that are relatively uniform in size if you’re baking multiple potatoes at once. This way they’ll all finish cooking at the same time. Check each potato for soft spots, green patches, or lots of eyes (those little sprouts). A good baking potato should feel firm all over and have fairly smooth skin without too many blemishes. Some people think bigger is better, but super huge potatoes can take forever to cook through and might end up with overcooked outsides before the center is done.
Temperature and timing for perfect results
Most recipes say to bake potatoes at 400 degrees, but cranking the heat up to 450 degrees actually works better for getting that crispy skin while keeping the inside perfectly fluffy. The higher temperature creates better contrast between the exterior and interior. Plan on about an hour for medium-large potatoes at this temperature. Don’t try to rush it by going even hotter—you’ll end up with burnt skin and a raw center, which is the worst possible outcome for a baked potato.
You can tell when a potato is done by squeezing it gently with an oven mitt—it should give easily and feel soft throughout. Another test is inserting a knife or skewer into the thickest part; it should slide in without any resistance. Some people bake potatoes for way too long thinking more time equals better results, but overcooking actually makes them dry and grainy. If you’re baking several potatoes at once, rotate them halfway through cooking so they all get even heat exposure. The ones near the back or sides of the oven might cook slightly faster than those in the center.
Prep steps that make a real difference
Before you even think about cutting or seasoning your potato, give it a really good scrub under running water. Potatoes grow underground and can have dirt hiding in all the little crevices and eyes. Use a vegetable brush if you have one, or just scrub well with your hands. Dry the potato completely with a towel after washing—this step is important because wet skin won’t crisp up properly in the oven. Any moisture on the outside will steam instead of crisp, leaving you with soft skin nobody wants to eat.
After drying, some people like to rub the skin with olive oil or butter and add extra salt and pepper before baking. This adds another layer of crispiness and seasoning that really enhances the final product. If you’re using the bloomin’ method, make your cuts about a quarter inch apart in both directions. A sharp knife is crucial here—a dull knife will slip and could lead to uneven cuts or even cutting yourself. Take your time with the cutting; it gets easier after you’ve done a couple. The potato should spread open slightly from the cuts but still hold together as one piece.
Loading up your potato the right way
Once your potato comes out of the oven, let it rest for a minute or two before adding toppings. This brief rest lets the steam redistribute so you don’t burn your mouth on the first bite. If you used the bloomin’ method, gently press down on the potato to open up all those cuts you made earlier. The potato will spread open like a flower, creating lots of space for toppings to fall into. Start with butter first—add it while the potato is still steaming hot so it melts completely and soaks into all those fluffy bits.
From there, the topping possibilities are endless. Classic combinations like sour cream, chives, bacon bits, and shredded cheese never disappoint. But you can also go wild with things like chili, broccoli and cheese, pulled pork, buffalo chicken, or even taco fixings. The beauty of a properly baked potato is that it tastes amazing even with just butter and salt, so any toppings you add are a bonus rather than a necessity to make it edible. Don’t be shy about adding toppings—a well-baked potato can handle generous amounts without getting soggy or falling apart.
Common mistakes that ruin baked potatoes
One huge mistake is wrapping potatoes in foil before baking. People do this thinking it helps them cook faster or stay moist, but it actually steams the potato instead of baking it. You end up with soft, pale skin that’s not appealing at all. The foil traps moisture against the skin, which is the exact opposite of what you want. If you see a recipe that tells you to wrap potatoes in foil, just ignore that step entirely. Your potatoes will be so much better without it.
Another common error is not poking holes or making cuts in the potato before baking. Without any way for steam to escape, pressure builds up inside and the potato can actually explode in your oven. It’s rare, but it happens and creates a huge mess. Even if it doesn’t explode, trapped steam makes the interior gummy instead of fluffy. Also, don’t skip preheating your oven properly. Starting potatoes in a cold oven throws off the cooking time and can lead to uneven results. Always let your oven come to full temperature before putting the potatoes in.
Making multiple potatoes at once
When you’re cooking for a crowd, baking a dozen potatoes at once is totally doable as long as you give them enough space. Don’t crowd them too close together on the baking sheet or in the salt bed—they need air circulation to crisp up properly on all sides. If you’re using the salt method, you might need two baking dishes to fit them all comfortably. Arrange them so none are touching each other, and make sure they’re similar sizes so they finish cooking at the same time.
Keep in mind that a full oven of potatoes might take slightly longer to cook than just one or two potatoes. The oven has to work harder to maintain temperature with more food inside. Check them all at the one-hour mark, but be prepared to give them an extra 10-15 minutes if needed. You can bake potatoes ahead of time if you’re planning a big meal—just reheat them in a 350-degree oven for about 15 minutes before serving. They won’t be quite as crispy as fresh-baked, but they’ll still be pretty good and save you tons of stress on the day of your dinner party or gathering.
Getting perfect baked potatoes really isn’t that hard once you know the right techniques. The bloomin’ cutting method and salt baking might seem like extra work at first, but they become second nature after you’ve done them a few times. And the payoff is absolutely worth it—potatoes that are crispy on the outside, fluffy on the inside, and tasty enough to enjoy with minimal toppings. Try this method once and you’ll never go back to your old way of making baked potatoes again.
Perfect Bloomin’ Baked Potatoes
Course: Dinner Recipes4
servings15
minutes1
hour280
kcalTransform ordinary potatoes into restaurant-quality baked potatoes with crispy skin and impossibly fluffy insides using this game-changing method.
Ingredients
4 large russet potatoes
3-4 cups coarse kosher salt or sea salt
2 tablespoons olive oil or melted butter
1 tablespoon additional salt for rubbing
1 teaspoon black pepper
4 tablespoons butter for serving
Sour cream for topping (optional)
Shredded cheddar cheese for topping (optional)
Chopped chives or green onions for topping (optional)
Directions
- Preheat your oven to 450 degrees Fahrenheit and pour the coarse salt into a baking dish, creating a layer about half an inch thick. The salt bed should be large enough to hold all four potatoes with space between them. While the oven heats up, thoroughly scrub each potato under running water using a vegetable brush or your hands to remove all dirt and debris. Pat the potatoes completely dry with a clean kitchen towel, making sure no moisture remains on the skin.
- Place one potato on a cutting board and use a sharp knife to make parallel cuts across the potato, spacing them about a quarter inch apart. Cut deep into the potato but stop about half an inch from the bottom so you don’t slice all the way through. Rotate the potato 90 degrees and make another series of parallel cuts in the opposite direction, creating a grid pattern. The potato should stay together as one piece but have cuts throughout that will open up during baking. Repeat this process with the remaining three potatoes, taking care to keep your cuts even and consistent.
- Brush each potato generously with olive oil or melted butter, making sure to get the oil into the cuts you just made. The oil helps crisp the skin and adds richness to the overall taste. Sprinkle the additional tablespoon of salt and the black pepper over all the potatoes, using your hands to rub the seasonings into the skin and down into the cuts. Don’t be shy with the seasoning—the potato can handle it and needs that exterior seasoning to really shine.
- Nestle each prepared potato into the salt bed in your baking dish, making sure they’re sitting firmly in the salt but not completely buried. Space them evenly so air can circulate around each potato for even cooking. Place the baking dish in the preheated oven on the center rack. Set a timer for 60 minutes, though you’ll want to check them at the one-hour mark to see if they need additional time.
- After one hour, carefully squeeze one potato with an oven mitt to test for doneness—it should feel soft and give easily when pressed. You can also insert a knife or skewer into the thickest part; it should slide in without any resistance. If the potatoes still feel firm in the center, return them to the oven and check again in 10-minute intervals. Larger potatoes may take up to 75 minutes total.
- Once the potatoes are fully cooked, remove the baking dish from the oven and carefully lift each potato out of the salt using tongs or a large spoon. Brush off any excess salt clinging to the skin, though a light coating is fine and adds to the taste. Let the potatoes rest for 2-3 minutes before serving—this brief rest allows the steam inside to redistribute and prevents you from burning your mouth on the first bite.
- Place each potato on a serving plate and gently press down on the top to open up the cuts you made earlier. The potato should spread open like a flower, revealing all the fluffy interior and creating lots of crevices for toppings. While the potato is still steaming hot, add a tablespoon of butter to each one, letting it melt down into all those cuts.
- Serve immediately with your choice of toppings on the side so everyone can customize their potato. Traditional options like sour cream, shredded cheese, bacon bits, and chives work perfectly with this preparation method. The bloomin’ cuts create natural pockets that hold toppings better than regular baked potatoes, so feel free to be generous with whatever you’re adding.
Notes
- You can save and reuse the salt for future batches of baked potatoes. Just store it in an airtight container after it cools completely. The salt doesn’t absorb much from the potatoes and works perfectly for several uses.
- If you don’t have enough salt for the baking method, you can still use the bloomin’ cutting technique and bake the potatoes directly on the oven rack. You’ll get the fluffy interior and better topping distribution, though the skin won’t be quite as crispy.
- For easier cutting, place two wooden spoons or chopsticks on either side of the potato as guides. This prevents you from accidentally cutting all the way through the bottom.
- Leftover baked potatoes can be stored in the refrigerator for up to 4 days. Reheat them in a 350-degree oven for about 15 minutes to restore some of the crispiness.
Frequently asked questions
Q: Can I use this method with sweet potatoes?
A: Yes, the bloomin’ method works great with sweet potatoes too. They cook slightly faster than russets, so check them around the 45-50 minute mark. The salt baking creates an amazing caramelized skin on sweet potatoes that’s absolutely delicious.
Q: What if I don’t have coarse salt for the baking method?
A: You can still make excellent bloomin’ potatoes without the salt bed. Just place them directly on the oven rack or on a baking sheet lined with parchment paper. Rub the outside with oil and salt as directed, and you’ll still get great results, though the skin won’t be quite as crispy.
Q: How do I know if my potato is bad before baking it?
A: Avoid potatoes with soft spots, a strong odor, wrinkled skin, or green patches. Green areas contain solanine, which tastes bitter and can cause stomach upset. Small sprouts can be cut off, but if the potato is heavily sprouted or shriveled, it’s past its prime.
Q: Can I prepare the cut potatoes ahead of time?
A: It’s best to cut and bake the potatoes on the same day for optimal results. If you must prep ahead, submerge the cut potatoes in cold water to prevent browning, then drain and dry them thoroughly before adding oil and baking. This adds extra steps but works in a pinch.