 (1)")

Nothing beats coming home after a long day and realizing dinner can be ready in under 15 minutes. This sticky honey garlic chicken recipe transforms basic ingredients into something that tastes like it took hours to make. With just a handful of pantry staples and some chicken, this dish delivers that perfect balance of sweet and savory that makes everyone ask for seconds.
Why thin chicken breasts make all the difference
Most people grab whatever chicken is on sale, but thin-sliced chicken breasts are the secret to getting this recipe done fast. Regular thick chicken breasts take forever to cook through, and by the time the inside is done, the outside is often overcooked and dry. Thin chicken breasts cook evenly in just 3-4 minutes per side, which means your sauce won’t burn while waiting for the meat to finish.
If your grocery store doesn’t sell them pre-sliced, grab a sharp knife and carefully cut regular chicken breasts in half lengthwise. It takes an extra minute but saves you at least 10 minutes of cooking time. The thin slices also mean the chicken absorbs more of that sticky sauce, so every bite is packed with sweetness and garlic goodness.
The flour coating trick most people skip
Here’s where many home cooks go wrong – they skip the flour step thinking it’s unnecessary. That light dusting of flour on your chicken isn’t just busy work. It creates a surface that helps the sticky sauce actually stick to the meat instead of sliding off into the pan. Without it, you end up with plain chicken sitting in a pool of sauce instead of properly coated pieces.
The flour also helps create a slight crust on the chicken, which adds texture and keeps the meat juicy. Don’t worry about making it perfect – just toss the seasoned chicken pieces in flour until they’re lightly coated. For those avoiding gluten, cornstarch works just as well, or you can skip the coating entirely if needed.
Getting the sauce consistency just right
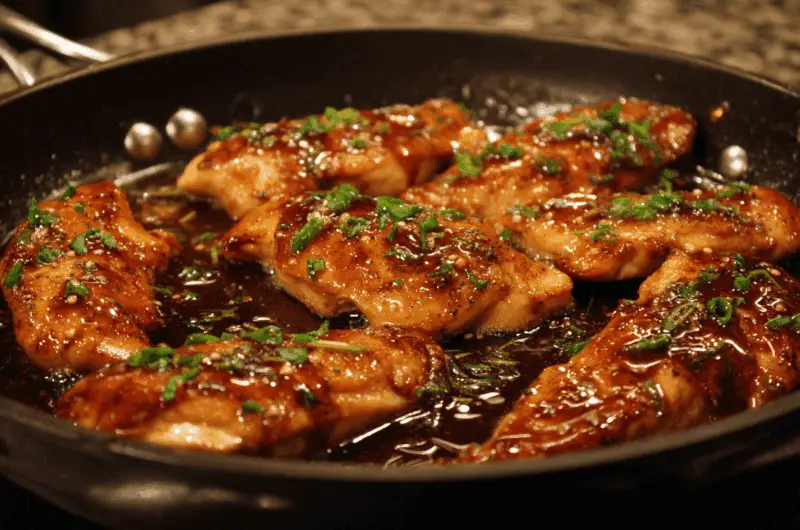
The sauce should coat the back of a spoon when it’s ready, but many people either undercook it and end up with thin, watery sauce, or overcook it and create something thick enough to use as glue. The key is watching for that moment when the bubbling slows down and the sauce starts looking glossy instead of watery. This usually takes about 3-4 minutes of simmering.
If your sauce gets too thick, just add a tablespoon of water and stir. Too thin? Let it bubble for another minute or two. The cornstarch in the mixture will continue to thicken the sauce slightly even after you remove it from heat, so err on the side of slightly too thin rather than too thick.
Fresh garlic versus pre-minced makes a huge difference
Those little jars of pre-minced garlic seem convenient, but they create a completely different dish. Fresh garlic gives you that sharp, pungent bite that mellows into sweet nuttiness when cooked. Pre-minced garlic from a jar has been sitting in preservatives and tastes more like garlic-flavored salt water. For a recipe where garlic is literally in the name, this matters.
Six cloves might seem like a lot, but remember that cooking mellows garlic significantly. The fresh minced garlic gets sautéed for just about a minute before the liquid ingredients go in, which is exactly the right amount of time to release those oils without making it bitter.
Why butter beats oil for this recipe
Many stir-fry recipes call for vegetable oil, but butter transforms this dish into something special. The milk proteins in butter brown slightly when heated, adding a nutty richness that complements the honey perfectly. Oil would make this taste like standard takeout, but butter gives it that homemade, comfort-food quality that makes people think you’re a much better cook than you actually are.
The recipe uses butter in two stages – first to cook the chicken, then more butter to sauté the garlic. This prevents the butter from burning while ensuring every component gets that rich, buttery taste. If you’re concerned about the butter browning too much, just keep the heat at medium-high rather than high.
The apple cider vinegar balances everything out
Honey can make dishes cloyingly sweet if there’s nothing to balance it out. That single tablespoon of apple cider vinegar cuts through all that sweetness and adds the brightness that makes this dish craveable instead of just sugary. Regular white vinegar would work in a pinch, but apple cider vinegar has a mellower, more complex flavor that doesn’t overpower the other ingredients.
The vinegar also helps tenderize the chicken slightly and adds that subtle tang that makes your mouth water for the next bite. Don’t be tempted to add more thinking it will make the dish more complex – one tablespoon is the perfect amount to enhance without overwhelming the honey and garlic.
Timing the rice so everything finishes together
The worst part of any quick dinner is having the main dish ready while your side is still cooking. Since this chicken only takes 15 minutes total, start your rice first if you’re making it on the stovetop. Rice cooker users can start theirs at the same time as the chicken prep – most rice cookers finish right around the 15-minute mark for white rice.
If you forgot to start the rice early, don’t panic. The finished chicken actually improves if it sits in that sauce for a few extra minutes, absorbing more of those sweet and savory notes. Just cover the pan and remove it from heat while your rice finishes up. The sticky sauce will keep the chicken moist and continue developing its glaze.
What vegetables actually work with this dish
Not all vegetables complement honey garlic chicken equally well. Steamed broccoli is the classic choice because its slight bitterness balances the sweet sauce, and it cooks quickly in the microwave while you’re making the chicken. Green beans work similarly well, and both vegetables are sturdy enough to hold up to that sticky sauce without getting soggy.
Avoid delicate greens like spinach or lettuce, which will wilt into mush when they meet the hot, saucy chicken. Bok choy and cabbage are better choices if you want leafy vegetables – they have enough structure to maintain some texture. Steamed vegetables work better than roasted ones here, since roasted vegetables often have their own caramelized sweetness that competes with the honey sauce.
Making this work for meal prep
This recipe doubles easily if you want to make extra for lunches during the week. The chicken reheats beautifully in the microwave because all that sauce keeps it moist. Just store the chicken and rice in separate containers – mixing them together makes the rice gummy when reheated. The sauce might separate slightly in the fridge, but a quick stir when reheating brings it back together.
The cooked chicken keeps for about 4 days in the refrigerator and freezes well for up to 3 months. When reheating from frozen, let it thaw overnight in the fridge first, then microwave with a splash of water to help steam it back to life. The sticky coating maintains its texture better than most sauced dishes when frozen and reheated.
This sticky honey garlic chicken proves that impressive dinners don’t need complicated techniques or expensive ingredients. With just 15 minutes and some basic pantry items, dinner becomes something everyone actually looks forward to eating instead of just another weeknight obligation.
Sticky Honey Garlic Chicken
Course: Dinner4
servings3
minutes12
minutes280
kcalTender chicken breast coated in a glossy honey garlic sauce that’s sweet, savory, and ready in just 15 minutes.
Ingredients
1 to 1¼ pounds boneless, skinless chicken breasts (about 4 thinly sliced or 2 large halved)
Salt and pepper to taste
¼ cup all-purpose flour
4 tablespoons salted butter, divided
6 garlic cloves, minced
⅓ cup honey
1 tablespoon apple cider vinegar
1 tablespoon soy sauce
Directions
- Season the thinly sliced chicken breasts generously with salt and pepper on both sides. Place the flour in a shallow dish and dredge each piece of chicken, coating both sides lightly. Shake off any excess flour before cooking.
- Heat a large skillet over medium-high heat and add 2 tablespoons of butter. Once the butter melts and starts to foam, carefully add the floured chicken pieces in a single layer. Cook for 3-4 minutes on the first side until golden brown, then flip and cook another 3-4 minutes until the second side is golden and chicken is cooked through.
- Remove the cooked chicken from the skillet and set aside on a plate, keeping any juices that accumulate. Add the remaining 2 tablespoons of butter to the same skillet and let it melt. Add the minced garlic and sauté for about 1 minute until fragrant, being careful not to let it burn.
- Add the honey, apple cider vinegar, and soy sauce to the skillet with the garlic. Stir constantly and let the mixture simmer for 3-4 minutes until it begins to thicken and becomes glossy. The sauce should coat the back of a spoon when ready.
- Return the chicken and any accumulated juices to the skillet with the sauce. Gently toss the chicken pieces to coat them completely with the sticky sauce. Cook for an additional 2-3 minutes, spooning the sauce over the chicken to create an even glaze.
- Remove from heat and let the chicken rest in the sauce for 1-2 minutes to allow the glaze to set slightly. Serve immediately over steamed rice with your choice of vegetables. Garnish with sliced green onions or sesame seeds if desired.
Notes
- For gluten-free version, substitute cornstarch for flour or omit the coating entirely
- If sauce becomes too thick, add 1 tablespoon of water and stir; if too thin, simmer an extra minute
- Chicken can be stored in refrigerator for 4 days and reheats well in microwave with a splash of water
Frequently Asked Questions
Q: Can I use chicken thighs instead of chicken breasts?
A: Absolutely! Chicken thighs work wonderfully in this recipe and stay even more juicy than breasts. Just cut them into bite-sized pieces and follow the same cooking method. They might take an extra minute or two to cook through.
Q: What if I don’t have apple cider vinegar?
A: Regular white vinegar or lemon juice work as substitutes. Use the same amount, but keep in mind that white vinegar is sharper and lemon juice will add a slightly citrusy note to the dish.
Q: How do I know when the sauce is thick enough?
A: The sauce is ready when it coats the back of a spoon and looks glossy instead of watery. It should drip slowly from the spoon rather than running off quickly. Remember it will continue to thicken slightly as it cools.
Q: Can I make this recipe ahead of time?
A: Yes, but it’s best served fresh. If making ahead, slightly undercook the chicken and store it separately from the sauce. When reheating, combine them in a skillet over low heat until warmed through and the sauce re-glazes the chicken.