 (1)")

Ever noticed those delicate, web-like crispy edges surrounding dumplings at your favorite Chinese restaurant? That magical lace-like coating isn’t just for show – it’s surprisingly easy to recreate at home using ingredients already sitting in your pantry. Most home cooks assume this restaurant technique requires special equipment or professional skills, but the truth is you only need flour, water, and a few basic staples to transform ordinary dumplings into something extraordinary.
Most people skip the oil step completely
The biggest mistake when making dumpling skirts happens before the slurry even touches the pan. Many home cooks use barely any oil, thinking they’re being health-conscious or trying to prevent sticking. This actually works against creating that beautiful lace pattern everyone loves. The oil serves a crucial purpose beyond preventing sticking – it creates the sizzling reaction that forms those delicate, crispy webs when the flour mixture hits the hot surface.
A proper dumpling skirt needs at least 2-3 tablespoons of neutral oil in the pan. This generous amount allows the water-flour mixture to bubble and separate into that signature lattice pattern. Without enough oil, the mixture just forms a flat, boring pancake instead of the intricate lace design that makes restaurant dumplings so appealing. Think of the oil as your artistic medium – it’s what transforms simple ingredients into an impressive presentation.
Your flour mixture needs constant stirring
Cornstarch and flour have a sneaky habit of settling to the bottom of your bowl the moment you stop stirring. This separation creates uneven results when poured into the pan – some areas get thick, gooey spots while others remain watery. The result is a patchy, inconsistent skirt that breaks apart instead of forming one cohesive crispy layer. Professional cooks know to give their slurry a vigorous stir right before adding it to the hot oil.
The basic mixture combines ¼ cup water, 1 teaspoon cornstarch, 1 teaspoon all-purpose flour, and a pinch of salt. Some recipes call for different ratios, but this combination creates the perfect balance between delicate crispiness and structural integrity. Experienced cooks recommend mixing these ingredients in a small bowl first, then giving it one final stir just before pouring. The key is working quickly once you start – hesitation leads to separation and uneven results.
Pan size matters more than most realize
Using the wrong pan size ruins even the most perfectly prepared slurry. A pan that’s too large requires more liquid mixture to cover the bottom properly, which means longer cooking times and potentially burnt dumplings. A pan that’s too small crowds the dumplings together, preventing proper steam circulation and creating soggy spots instead of crispy edges. The sweet spot for most home kitchens is a 10-12 inch non-stick pan with a tight-fitting lid.
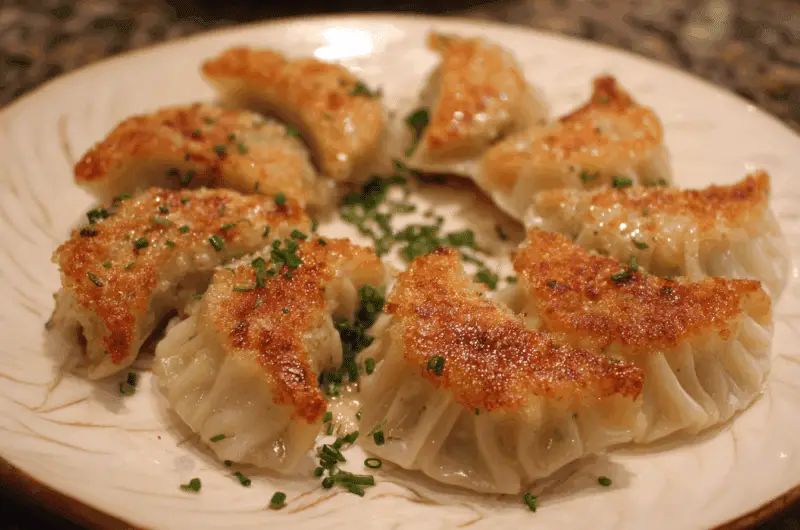
Seven dumplings arranged in a circular pattern works perfectly in a standard 10-inch pan. This arrangement leaves enough space between each dumpling for the skirt to form properly while ensuring even heat distribution. The circular pattern isn’t just aesthetic – it helps the liquid flow evenly around each dumpling, creating those beautiful connecting bridges between pieces. Restaurant techniques emphasize this spacing because overcrowded pans produce steamed dumplings instead of the desired crispy-bottom, tender-top combination.
Temperature control prevents burning disasters
High heat seems logical for achieving crispy results, but it’s actually the fastest way to burn your dumpling skirt before it properly sets. The delicate flour mixture needs time to cook through and develop its structure. Too much heat creates a burnt exterior with a gummy, undercooked interior. Medium to medium-high heat provides the perfect balance, allowing the water to evaporate gradually while the starches develop that satisfying crunch.
Watch for consistent sizzling sounds throughout the cooking process – this indicates the right temperature range. If the sizzling stops completely, increase the heat slightly. If it becomes violent and spattery, reduce the heat immediately. The entire process takes about 7-8 minutes total: 2 minutes for initial browning, 5 minutes covered steaming, and 1-2 minutes uncovered for final crisping. Professional kitchens often rotate the pan during the final stage to ensure even browning across the entire surface.
Frozen dumplings need different liquid ratios
Store-bought frozen dumplings require adjustments to the standard technique. These dumplings start from a completely frozen state, meaning they need more time and moisture to cook through properly. Using the same liquid amount as fresh dumplings results in a skirt that forms too quickly, leaving the dumpling centers still frozen. The solution involves adding more liquid – enough to reach about one-third of the way up the dumplings instead of the usual quarter.
Frozen dumplings also benefit from a slightly longer steaming phase. Extend the covered cooking time to 6-7 minutes instead of the standard 5 minutes for fresh dumplings. This extra time ensures the centers heat through completely while still allowing the skirt to form properly. The key indicator is when most of the liquid has evaporated and you can see the lacy pattern starting to develop. Don’t rush this step – patient cooking prevents the disappointment of perfectly crispy outsides with cold, dense centers.
Flipping technique preserves the delicate structure
The moment of truth arrives when transferring your masterpiece from pan to plate. Many home cooks try to slide or scoop the dumplings out, which instantly shatters the delicate skirt into pieces. The professional method involves placing a large plate directly on top of the pan, then quickly flipping the entire assembly in one smooth motion. This preserves the intricate lace pattern and presents the crispy side up for maximum visual impact.
Choose a plate slightly larger than your pan to catch any overhanging edges. The plate should be room temperature – hot plates can cause thermal shock that cracks the crispy layer. Hold both the pan handle and plate firmly, then flip confidently in one quick motion over the sink or counter. Hesitation during this step often leads to broken skirts or scattered dumplings. Practice this technique with empty pans first if the motion feels unfamiliar.
Common ingredients create different textures
All-purpose flour creates a slightly thicker, more substantial skirt with good structural integrity. This works well for beginners because it’s more forgiving and less likely to break during serving. Cornstarch produces a thinner, more delicate result that’s closer to what high-end restaurants serve. Rice flour falls somewhere in between, offering delicate texture while maintaining reasonable durability. Many experienced cooks combine these ingredients to get the best of both worlds.
The ratio matters as much as the ingredient choice. A 50-50 split between all-purpose flour and cornstarch creates an ideal balance of structure and delicacy. Pure cornstarch skirts look stunning but require very gentle handling. Pure flour versions hold up better to enthusiastic serving but lack that restaurant-quality finesse. Experiment with different combinations to find what works best for your cooking style and presentation needs.
Timing the lid removal makes or breaks results
Lifting the lid too early releases essential steam before the dumplings cook through. Waiting too long creates soggy, overcooked results. The perfect timing comes from listening to your pan – when the vigorous bubbling and sizzling sounds calm down to a gentler simmer, it’s usually time to check. This typically happens around the 5-minute mark, but every stove and pan combination behaves differently.
Look for visual cues when you do lift the lid. Most of the liquid should have evaporated, and you should see the beginnings of that lacy pattern forming around the dumplings. If there’s still standing liquid, replace the lid and cook for another minute before checking again. Once you see the pattern forming, remove the lid completely and let the remaining moisture evaporate while the skirt crisps up. This final uncovered phase usually takes 1-2 minutes and transforms good results into spectacular ones.
Salt addition enhances both taste and texture
That pinch of salt in the slurry isn’t just for seasoning – it actually helps the starches develop better texture and promotes more even browning. Salt affects how proteins and starches interact during cooking, leading to a more structured and cohesive final product. Without salt, the skirt tends to be bland and can develop an unpleasant raw flour taste that lingers even after proper cooking.
Use fine table salt rather than coarse kosher salt for better distribution throughout the mixture. The amount should be subtle – about ¼ teaspoon per batch is plenty. Too much salt makes the skirt overpowering and can interfere with whatever dipping sauces you plan to serve alongside. The goal is enhancement, not dominance. This small addition elevates the entire dish from a simple cooking technique to a restaurant-quality presentation that impresses every time.
Creating perfect dumpling skirts transforms ordinary frozen dumplings into restaurant-quality presentations using nothing more than pantry staples. The technique takes practice, but once mastered, it becomes as natural as any other cooking skill. Next time you’re craving something special for dinner, remember that impressive results often come from simple techniques executed well.
Perfect Crispy Dumpling Skirt
Course: Appetizer4
servings5
minutes10
minutes25
kcalTransform ordinary dumplings into restaurant-quality masterpieces with this foolproof technique for creating delicate, lacy crispy skirts using simple pantry ingredients.
Ingredients
7 fresh or frozen dumplings
3 tablespoons neutral oil (vegetable or canola)
¼ cup water
1 teaspoon all-purpose flour
1 teaspoon cornstarch
¼ teaspoon salt
Directions
- Heat the neutral oil in a 10-12 inch non-stick pan with a tight-fitting lid over medium-high heat. Arrange the dumplings in a circular pattern in the pan, ensuring they don’t touch each other. Allow about 1 inch of space between each dumpling for proper skirt formation.
- Cook the dumplings for 2-3 minutes until the bottoms turn golden brown. Listen for consistent sizzling sounds, which indicate the proper temperature. Avoid moving or flipping the dumplings during this initial browning phase.
- While dumplings brown, combine water, flour, cornstarch, and salt in a small bowl. Stir until completely smooth with no lumps remaining. Set aside but remember to stir again right before using, as the starches will settle.
- Give the flour mixture one final vigorous stir, then slowly pour it into the pan around the dumplings. Be careful of splattering as the liquid meets the hot oil. The mixture should come up about ¼ of the way up fresh dumplings, or ⅓ of the way up frozen dumplings.
- Immediately cover the pan with the lid and reduce heat to medium. Steam for 5 minutes for fresh dumplings or 6-7 minutes for frozen dumplings. Listen for the bubbling sounds to calm down to a gentle simmer, which indicates proper cooking progress.
- Remove the lid and check for the lacy pattern formation around the dumplings. Most liquid should have evaporated, and you should see a delicate web-like structure connecting the dumplings. If liquid remains, continue cooking uncovered for 1-2 more minutes.
- Once the skirt appears golden and crispy with no wet spots remaining, remove from heat. The skirt should make crackling sounds when gently tapped with chopsticks. Allow to cool for 30 seconds to let the structure set properly.
- Place a large plate directly over the pan, ensuring it covers all the dumplings. Hold both the pan handle and plate firmly, then quickly flip the entire assembly in one confident motion. The crispy skirt should now be facing up, creating an impressive presentation ready for serving.
Notes
- For frozen dumplings, use more liquid (reaching ⅓ up the dumplings) and extend steaming time to 6-7 minutes
- The oil amount is crucial – don’t skimp as it creates the lacy pattern when combined with the flour mixture
- Always stir the flour mixture right before adding to the pan, as cornstarch settles quickly
- Use a non-stick pan with a properly fitting lid for best results
- If the skirt breaks during flipping, it’s still delicious – just arrange pieces around the dumplings
Frequently Asked Questions
Q: Can I use any type of flour for the dumpling skirt?
A: All-purpose flour works great for beginners because it creates a sturdy skirt that’s less likely to break. Cornstarch makes a more delicate, restaurant-style skirt but requires gentler handling. Rice flour offers a middle ground between the two. Many cooks mix equal parts all-purpose flour and cornstarch for the perfect balance of structure and delicacy.
Q: Why does my dumpling skirt always turn out soggy instead of crispy?
A: This usually happens when there’s not enough oil in the pan or the heat is too low. You need at least 2-3 tablespoons of oil to create the proper sizzling reaction. Also, make sure to cook uncovered for the final 1-2 minutes after steaming to evaporate any remaining moisture and crisp up the bottom layer.
Q: How do I prevent the flour mixture from creating lumps in my skirt?
A: Always mix your flour and cornstarch with water in a separate bowl first, whisking until completely smooth. The key is giving it one final stir right before adding to the pan, since the starches settle quickly. Pour the mixture slowly and evenly around the dumplings to ensure uniform distribution.
Q: What should I do if my dumpling skirt breaks when I try to flip it?
A: Don’t panic – it still tastes amazing! Broken pieces can be arranged around the dumplings for presentation. To prevent breaking, make sure the skirt is fully set and golden before attempting to flip. Use a plate slightly larger than your pan and flip in one confident, quick motion rather than hesitating.