 (1)")

Summer heat got your oven off-limits, but company’s coming over expecting dessert? This stunning no-bake strawberry lemon swirl tart delivers all the wow factor of a fancy bakery creation without adding a single degree to your kitchen temperature. The secret lies in perfectly balanced sweet strawberries and tangy lemon that create beautiful marbled patterns, fooling everyone into thinking you spent hours perfecting pastry techniques when you actually just mixed, swirled, and chilled.
Graham cracker crusts beat pastry every time
Forget rolling pins and temperature-sensitive butter – graham cracker crusts are the unsung heroes of impressive desserts. Simply crush graham crackers with melted butter and sugar, press into your tart pan, and you’ve got a foundation that’s actually more stable than traditional pastry. The slightly sweet, honeyed crunch complements both strawberry and lemon perfectly, plus it won’t get soggy like some pastry crusts can.
The beauty of this approach means zero stress about overworking dough or getting the right consistency. Your crust forms in minutes and chills while you prep the filling. No-bake desserts like this one prove that sometimes the simplest techniques create the most reliable results. Plus, you can make the crust up to two days ahead.
Fresh strawberries need just a little help
Raw strawberries can be watery and unpredictable in desserts, but a quick maceration process transforms them into jam-like perfection. Toss sliced strawberries with sugar and let them sit for 30 minutes – the sugar draws out natural juices while concentrating the berry sweetness. This creates a glossy, syrupy mixture that won’t make your tart filling runny or cause the crust to become soggy.
The macerated berries also blend more easily with cream cheese and whipped cream, creating smoother swirls without chunks. If your strawberries aren’t perfectly ripe, add an extra tablespoon of sugar or a squeeze of lemon juice to boost their natural sweetness. This technique works for any berry and gives you restaurant-quality results at home with minimal effort.
Lemon zest makes all the difference
While lemon juice provides the necessary tartness, lemon zest delivers the aromatic oils that make this tart truly special. Those tiny yellow flecks contain concentrated lemon essence that hits your nose before the first bite, creating anticipation for the bright, citrusy filling. Fresh zest from two large lemons gives you the perfect balance without overwhelming the strawberry sweetness.
Always zest before juicing – it’s nearly impossible to zest a juiced lemon effectively. Use a microplane grater for the finest zest that incorporates seamlessly into your filling. The oils in fresh zest stay potent for about a week refrigerated, but they’re strongest when used immediately after grating. This small step elevates your tart from good to absolutely incredible.
Cream cheese temperature matters more than you think
Cold cream cheese creates lumps that refuse to blend smoothly, while overheated cream cheese becomes too thin to hold its shape. Room temperature cream cheese – soft enough to leave an indentation when pressed but not warm or melty – whips into silky perfection every time. Take your cream cheese out of the fridge about an hour before starting, or microwave it in 15-second intervals until just softened.
Properly softened cream cheese combines effortlessly with powdered sugar and creates a stable base for folding in whipped cream. This prevents overmixing, which can deflate your filling and result in a dense, heavy tart instead of the light, mousse-like texture that makes this dessert so appealing. Professional bakers know this trick separates amateur attempts from bakery-quality results.
Whipped cream needs gentle handling
Heavy cream whips best when both the cream and bowl are chilled, creating stable peaks that won’t collapse when folded into your cream cheese mixture. Stop whipping at soft peaks – slightly droopy but holding their shape – since the cream will continue to thicken as you fold it into the filling. Overwhipped cream becomes grainy and can even turn into butter, ruining your smooth tart texture.
Fold the whipped cream into your cream cheese mixture using a rubber spatula with gentle, sweeping motions rather than stirring vigorously. This preserves the airiness that makes the filling light and prevents the mixture from becoming dense. Add the cream in two additions for easier incorporation and better control over the final consistency.
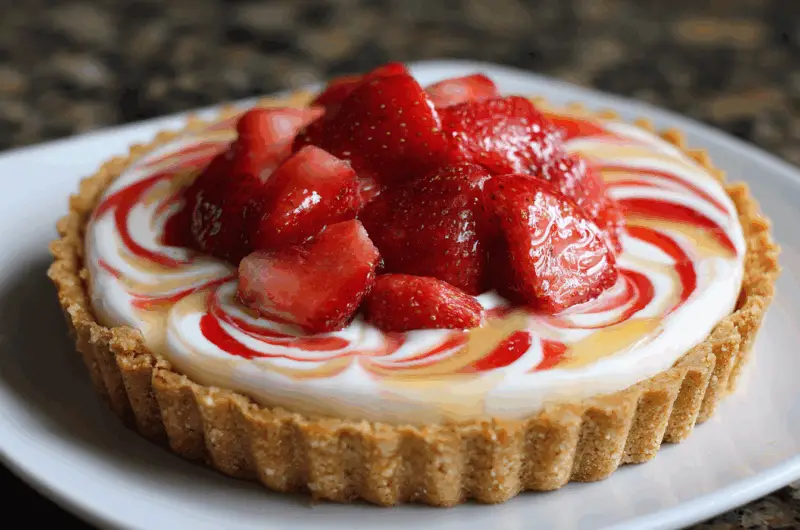
Swirling technique creates the visual magic
The gorgeous marbled effect happens when you layer dollops of strawberry and lemon filling alternately in your tart shell, then drag a knife or skewer through them in gentle figure-eight patterns. Start from the outside edge and work toward the center, lifting your knife completely between strokes to avoid over-mixing the colors. Less is more here – too much swirling muddles the colors instead of creating distinct ribbons.
For the most dramatic visual impact, make your dollops different sizes and don’t worry about perfect placement. The irregular pattern creates more interesting swirls than evenly spaced portions. This technique works for any two contrasting colors and flavors, making it perfect for customizing based on seasonal fruit availability or personal preferences.
Chilling time isn’t negotiable
Four hours minimum chilling time allows the filling to set properly and the graham cracker crust to firm up enough for clean slicing. Rushing this step results in a messy tart that falls apart when you try to remove slices. The cream cheese and whipped cream need time to meld together and achieve that perfect mousse-like consistency that holds its shape but still feels light on the tongue.
Overnight chilling is even better if you have the time, allowing all the components to marry completely and making serving much easier. Cover the tart loosely with plastic wrap, making sure the wrap doesn’t touch the surface to avoid disturbing your beautiful swirl pattern. The tart actually improves with longer chilling time, developing deeper, more integrated flavors.
Serving tips make the final impression
Use a sharp, thin-bladed knife dipped in warm water and wiped clean between each cut for picture-perfect slices. The warm blade glides through the chilled filling without dragging or creating messy edges. Start each cut from the center and work outward to prevent the filling from shifting or the crust from cracking under pressure.
Remove the tart from the refrigerator about 10 minutes before serving to take the chill off slightly, making it easier to cut and enhancing the flavors. Garnish individual slices with fresh strawberry slices or a small dollop of whipped cream for an extra elegant touch. The tart keeps covered in the refrigerator for up to three days, though it’s best within the first 48 hours.
Make-ahead strategies save party day stress
This tart is actually better when made a day ahead, giving all the flavors time to develop and meld together beautifully. The crust can be made up to three days in advance and stored covered at room temperature. The fruit can be macerated the morning of serving and refrigerated until needed. Having components prepped ahead means final assembly takes less than 20 minutes.
For special occasions, consider making two tarts with different fruit combinations – maybe strawberry-lemon and raspberry-lime – using the same base technique. The impressive presentation and incredible taste make this dessert perfect for dinner parties, potluck gatherings, or any time you want to serve something that looks professionally made but required zero baking skills or oven time.
This no-bake strawberry lemon swirl tart proves that impressive desserts don’t require hours of baking or advanced pastry skills. With simple techniques and quality ingredients, you can create a stunning centerpiece dessert that tastes like it came from an upscale bakery while keeping your kitchen cool and stress-free.
No-Bake Strawberry Lemon Swirl Tart
Course: Dessert8
servings30
minutes4
minutes340
kcalThis stunning tart combines fresh strawberries and bright lemon in a creamy, swirled filling on a buttery graham cracker crust.
Ingredients
1 1/2 cups graham cracker crumbs
1/3 cup melted butter
3 tablespoons granulated sugar
2 cups fresh strawberries, hulled and sliced
1/4 cup granulated sugar (for strawberries)
8 oz cream cheese, softened
1 cup powdered sugar
1/4 cup fresh lemon juice
2 tablespoons lemon zest
1 1/2 cups heavy whipping cream
Directions
- Combine graham cracker crumbs, melted butter, and 3 tablespoons sugar in a bowl until mixture resembles wet sand. Press firmly into bottom and up sides of a 9-inch tart pan with removable bottom. Use the bottom of a measuring cup to create an even, compact crust. Refrigerate while preparing filling.
- Toss sliced strawberries with 1/4 cup granulated sugar in a medium bowl. Let sit for 30 minutes, stirring occasionally, until strawberries release their juices and become syrupy. Mash gently with a fork to create a chunky jam-like consistency, leaving some pieces intact for texture.
- Beat softened cream cheese with an electric mixer until smooth and fluffy, about 2 minutes. Gradually add powdered sugar, beating until well combined. Mix in lemon juice and lemon zest until evenly distributed. The mixture should be smooth with no lumps remaining.
- In a separate chilled bowl, whip heavy cream until soft peaks form. Don’t overwhip – peaks should hold their shape but still be slightly droopy. Gently fold whipped cream into cream cheese mixture in two additions using a rubber spatula, being careful not to deflate the mixture.
- Divide cream cheese mixture in half. Fold macerated strawberries and their juices into one half, creating the strawberry filling. Leave the other half as lemon filling. Both mixtures should be well combined but not overmixed to maintain light, airy texture.
- Dollop alternating spoonfuls of strawberry and lemon filling into the chilled crust, varying the size and placement for natural-looking patterns. Don’t worry about perfect placement – irregular dollops create better swirls. Fill the entire tart shell with both mixtures.
- Use a knife or wooden skewer to create swirl patterns by dragging through the fillings in gentle figure-eight motions. Start from the outside edge and work toward center, lifting the knife completely between strokes. Avoid over-swirling, which can muddle the colors together.
- Cover tart loosely with plastic wrap, ensuring wrap doesn’t touch the surface. Refrigerate for at least 4 hours or overnight until fully set. Before serving, let tart sit at room temperature for 10 minutes for easier slicing. Use a sharp, warm knife wiped clean between cuts.
Notes
- Tart can be made up to 2 days ahead and stored covered in refrigerator
- For best results, use room temperature cream cheese that’s soft but not warm
- If strawberries aren’t very sweet, add an extra tablespoon of sugar during maceration
- Substitute frozen strawberries if fresh aren’t available – thaw completely and drain excess liquid
- Garnish with fresh berries and mint leaves just before serving for extra elegance
Frequently asked questions
Q: Can I use frozen strawberries instead of fresh?
A: Yes, but thaw them completely first and drain excess liquid. Frozen strawberries tend to be softer and more watery, so you may need to add an extra tablespoon of sugar and let them macerate a bit longer to achieve the right consistency.
Q: How long will this tart keep in the refrigerator?
A: The tart stays fresh for up to 3 days covered in the refrigerator. It’s actually best within the first 48 hours when the texture is at its peak. The graham cracker crust may soften slightly over time, but it will still taste delicious.
Q: Can I make this tart with other fruit combinations?
A: Absolutely! Try raspberry-lime, blueberry-lemon, or peach-orange combinations using the same technique. Just macerate the fruit with sugar first and adjust the citrus juice and zest to complement your chosen fruit.
Q: What if my cream cheese has lumps even after softening?
A: Press the cream cheese through a fine-mesh sieve before beating, or microwave it in 10-second intervals until just soft enough to beat smooth. Cold cream cheese is the most common cause of lumpy filling, so proper temperature is key.