 (1)")

Making lunch shouldn’t feel like solving a puzzle, especially when the temperature outside makes the idea of cooking completely unappealing. Most people think no-cook lunches mean sad desk salads or expensive takeout, but there’s a middle ground that tastes incredible and costs almost nothing to make. This plant-based twist on classic chicken salad proves that some of the best lunches happen when you never turn on the stove at all.
Why chickpeas work better than chicken sometimes
Chickpeas have this amazing ability to absorb whatever sauce or dressing you mix them with, making each bite more interesting than plain chicken ever could be. When you mash them just enough, they create the perfect texture – chunky enough to feel substantial but smooth enough to spread on bread or crackers. Unlike chicken that can dry out or get weird when it sits in the fridge, chickpeas actually get better after a day or two of marinating in all those good seasonings.
The best part about using chickpeas instead is that they’re already cooked when you buy them canned, so there’s literally zero cooking involved. You can make this salad at 11:59 PM on a Sunday night and still have amazing lunches for the week. Plus, chickpeas are way cheaper than chicken and they don’t go bad as quickly, which means less food waste and more money in your pocket.
Getting the texture just right matters more than you think
The secret to amazing chickpea chicken salad is knowing when to stop mashing. You want some chickpeas completely mashed up to create that creamy base, but you also want chunks that give you something to bite into. A potato masher works perfectly for this – just give the chickpeas a few good smashes until about half are broken down. If you go too far and turn everything into hummus, you’ve lost the whole point.
Some people try to use a food processor for this, but that usually results in chickpea paste rather than the chunky salad texture you’re going for. The hand-mashing method gives you complete control over the final result. You can always mash more, but you can’t un-mash something that’s already been turned to mush. This technique creates the perfect foundation that holds all your other ingredients together without being mushy.
Mayo alternatives that actually make it taste better
While regular mayo works fine, Greek yogurt brings a tangy brightness that makes the whole salad more interesting. The protein boost doesn’t hurt either, especially if you’re trying to make lunch actually fill you up until dinner. You can also try mashed avocado for a completely different but equally delicious result – it adds creaminess and healthy fats that make the salad feel more substantial.
Another option that surprisingly works well is tahini mixed with a little lemon juice and water to thin it out. This gives the salad a nutty, slightly Middle Eastern taste that pairs perfectly with the chickpeas. Whatever creamy base you choose, start with less than you think you need – you can always add more, but a soggy salad is pretty much impossible to fix once you’ve gone too far.
Crunchy additions that make every bite interesting
Celery is the classic choice for good reason – it adds crunch and a fresh, clean taste that cuts through all that creaminess. But don’t stop there. Diced red onion brings a sharp bite that wakes up your taste buds, while chopped bell peppers add sweetness and color. Even something as simple as diced cucumber can transform the whole salad by adding a cool, refreshing element.
Nuts and seeds take this salad to the next level. Sliced almonds, chopped walnuts, or even sunflower seeds add a completely different kind of crunch that makes each bite more satisfying. The key is adding these crunchy elements right before you eat the salad, not when you first make it. Otherwise, they’ll get soggy and lose that satisfying snap that makes them so appealing in the first place.
Sweet elements that nobody expects but everyone loves
Adding something sweet might sound weird in a savory salad, but it’s what takes this recipe from good to absolutely crave-worthy. Dried cranberries, chopped grapes, or diced apple all work beautifully. The sweetness balances out the tanginess of whatever creamy base you’re using and adds little bursts of unexpected goodness throughout the salad.
Grapes are probably the most traditional choice – they add juiciness and sweetness without being overwhelming. If you’re using apples, make sure to add them right before eating or toss them with a little lemon juice first to prevent browning. These sweet additions also help make the salad more filling and satisfying, which is especially important when you’re trying to make lunch last until your next meal.
Seasoning combinations that actually work
The right seasonings can make or break this salad. Start with the basics – salt, pepper, and a squeeze of fresh lemon juice to brighten everything up. From there, you can go in different directions depending on what sounds good. A little Dijon mustard adds tang and complexity, while garlic powder brings depth without the hassle of dealing with fresh garlic that might be too strong.
Fresh herbs make a huge difference if you have them available. Chopped dill, parsley, or chives all work wonderfully and add a fresh, bright element that makes the whole salad taste more sophisticated. If you’re using dried herbs, remember that they’re more concentrated than fresh ones, so use about half as much. The goal is to enhance the chickpeas and other ingredients, not overpower them with too much seasoning.
Storage tricks that keep it fresh all week
This salad actually gets better after sitting in the fridge overnight, which makes it perfect for meal prep. The chickpeas absorb all those good seasonings and the whole thing develops more complex tastes. Store it in an airtight container in the refrigerator and it’ll stay fresh for up to five days. Just give it a quick stir before serving since some separation is totally normal.
If you’re planning to eat this salad over several days, consider storing the crunchy elements separately and adding them when you’re ready to eat. This keeps nuts, seeds, and fresh vegetables from getting soggy while still allowing the base salad to develop those deeper tastes. You can portion it out into individual containers for grab-and-go lunches, which makes busy mornings so much easier when you don’t have to think about what to eat.
Different ways to serve it beyond just sandwiches
While this salad makes an excellent sandwich filling, there are so many other ways to enjoy it. Serve it over a bed of greens for a more substantial meal, or use it as a dip with crackers or cut vegetables. It also works great stuffed into pita pockets or wrapped up in a tortilla with some fresh spinach or lettuce for added crunch and nutrition.
For something different, try serving it warm by lightly heating it in a pan for just a minute or two. This changes the whole character of the dish and makes it feel more like a hot meal without requiring much effort. You can also use it as a topping for baked potatoes or sweet potatoes, which turns it into a more filling dinner option when lunch prep doubles as dinner prep.
Why this actually saves money compared to other options
Making this chickpea salad costs a fraction of what you’d spend on deli chicken salad or takeout lunches. A can of chickpeas costs under a dollar and makes enough salad for at least three or four substantial servings. When you add up the cost of all the other ingredients, you’re probably looking at less than fifty cents per serving for a lunch that’s actually filling and satisfying.
Compare that to buying lunch out, which easily costs eight to twelve dollars for something similar, and the savings add up quickly. Even if you buy the fancier organic ingredients, you’re still spending way less than you would on restaurant food. Plus, you know exactly what’s going into your food, which means no weird preservatives or excess sodium that you didn’t choose to add yourself.
This chickpea chicken salad proves that the best lunches often happen when you keep things simple and let good ingredients speak for themselves. It takes maybe ten minutes to throw together, costs almost nothing, and tastes better than most expensive alternatives. Once you try this version, regular chicken salad might start seeming like way more work than it’s worth.
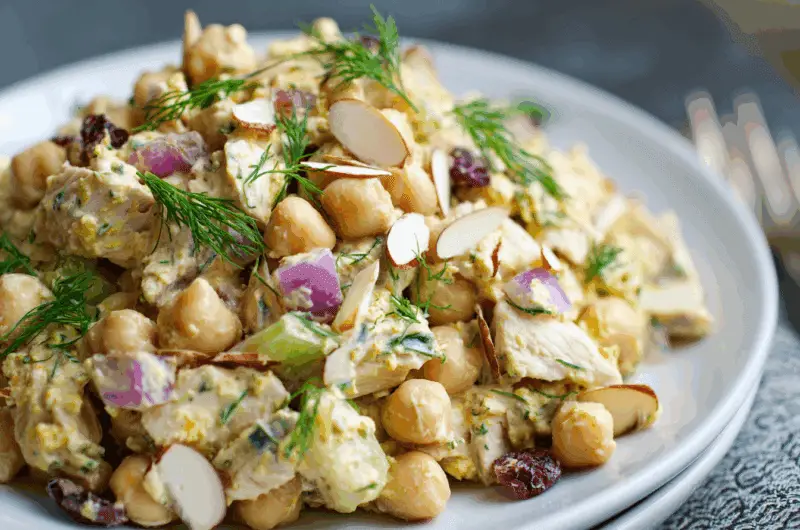
Easy Chickpea Chicken Salad
Course: Lunch4
servings10
minutes220
kcalThis protein-packed chickpea salad tastes just like classic chicken salad but requires zero cooking and costs a fraction of the price.
Ingredients
2 cans (15 oz each) chickpeas, drained and rinsed
1/3 cup plain Greek yogurt
2 tablespoons mayonnaise
1 large stalk celery, finely diced
1/4 cup red onion, finely diced
1/3 cup sliced almonds
1/2 cup dried cranberries
2 tablespoons fresh lemon juice
1 teaspoon Dijon mustard
1/2 teaspoon garlic powder
2 tablespoons fresh dill, chopped
Salt and pepper to taste
Directions
- Place the drained chickpeas in a large mixing bowl and use a potato masher to mash about half of them, leaving the rest chunky for texture. You want some chickpeas completely broken down to create a creamy base while keeping others intact for bite and substance.
- In a separate small bowl, whisk together the Greek yogurt, mayonnaise, lemon juice, Dijon mustard, and garlic powder until smooth and well combined. This creamy dressing will bind all the ingredients together and provide the classic chicken salad taste.
- Add the diced celery, red onion, and fresh dill to the mashed chickpeas and toss gently to distribute evenly. These vegetables provide essential crunch and fresh taste that makes each bite interesting and satisfying.
- Pour the prepared dressing over the chickpea mixture and stir thoroughly until everything is well coated and combined. Make sure to scrape the bottom of the bowl to incorporate all ingredients evenly throughout the salad.
- Fold in the sliced almonds and dried cranberries gently to maintain their texture and prevent them from breaking apart. These add sweetness and crunch that elevate the salad from ordinary to extraordinary.
- Season with salt and pepper to taste, starting with about 1/2 teaspoon of salt and 1/4 teaspoon of pepper, then adjusting as needed. Remember that the salad tastes will develop as it sits, so don’t over-season initially.
- Cover and refrigerate for at least 30 minutes to allow the tastes to meld together, though overnight is even better. The chickpeas will absorb the dressing and seasonings, creating a more cohesive and delicious final result.
- Serve chilled on bread for sandwiches, over greens for a salad, with crackers as a dip, or stuffed into pita pockets. Give the salad a quick stir before serving as some separation is normal after refrigeration.
Notes
- For best results, use a potato masher rather than a food processor to control the texture and avoid turning the chickpeas into paste
- Store in an airtight container in the refrigerator for up to 5 days – the taste actually improves after the first day
- If adding crunchy elements like nuts or seeds for meal prep, store them separately and add just before eating to maintain their texture
- This recipe is easily customizable – try adding diced apples, grapes, or different herbs based on your preferences
- For a completely vegan version, replace the Greek yogurt and mayonnaise with vegan alternatives or use mashed avocado
Frequently asked questions
Q: Can I use dried chickpeas instead of canned ones?
A: While you can use dried chickpeas, you’d need to cook them first, which defeats the purpose of a no-cook recipe. Canned chickpeas are already perfectly cooked and ready to use, saving you hours of soaking and cooking time.
Q: How long does this chickpea salad last in the refrigerator?
A: This salad stays fresh for up to 5 days when stored in an airtight container in the refrigerator. The taste actually improves after the first day as the chickpeas absorb all the seasonings and dressing.
Q: Can I freeze leftover chickpea salad?
A: Freezing isn’t recommended because the texture changes significantly when thawed. The creamy dressing separates and the vegetables become watery, making the salad unappetizing. It’s better to make smaller batches that you’ll eat within a week.
Q: What can I substitute if I don’t like celery?
A: Try diced bell peppers, cucumber, or even water chestnuts for crunch. Chopped apple or jicama also work well and add a slightly sweet element that complements the other ingredients perfectly.